


detail1
-
Posts
492 -
Joined
-
Last visited
-
Days Won
1
Content Type
Profiles
Forums
Events
Store
Posts posted by detail1
-
-
Freshly painted wheels back today, 2 tone light anthracite and silver edge. Pictures don't do them justice, they look faultless!!!
Just need to mend myself and get off these crutches now and fit them ☹️

-
Sent the wheels off to be refurbished/colour changed, got to wait patiently for a week until their return ☹️
-
Fitted new condensers today, all going well until I find the last hex bolt previously rounded of by some numpty, ended up taking the angle grinder to the bolt head and housing bracket, added an extra hour or so to a reasonably easy job 😬

-
24 minutes ago, Scottland said:
How do you find the alcantara trimmed wheel? I've always wanted one but worried it would look/feel terrible after a short time?
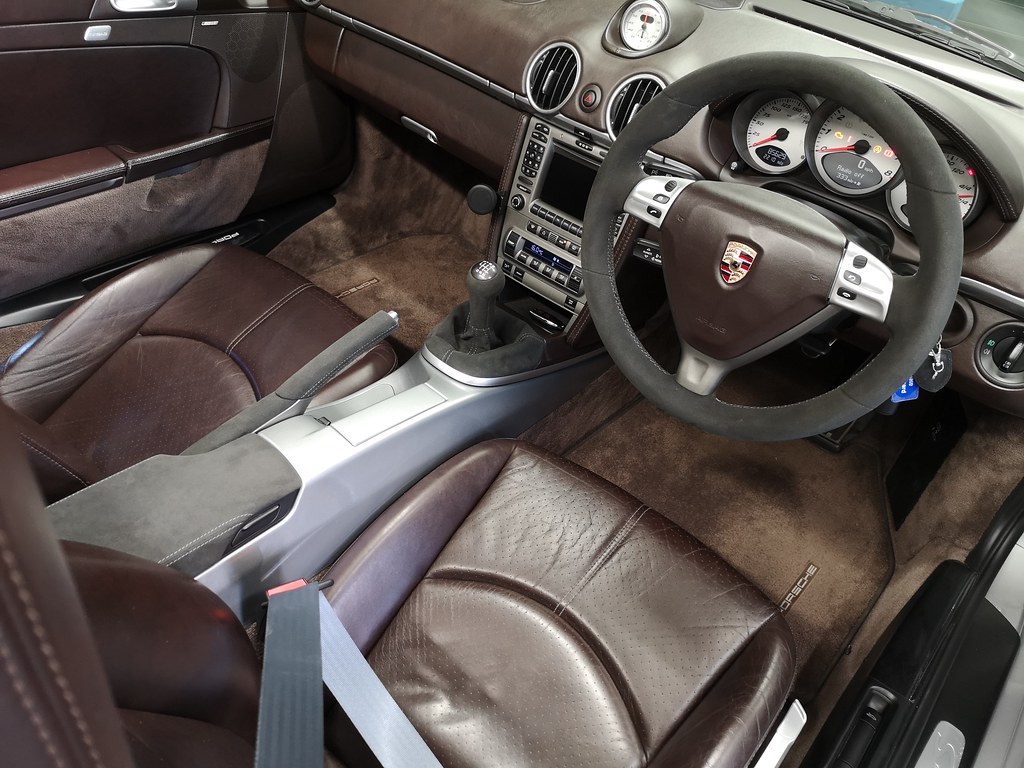
It's been fine, had it on there about 20 months now. The car isn't a daily driver, so not heavily abused- but a wipe over with a damp microfibre cloth and a quick brush and it's as good as new.
It's generally sweat and oils that make the nap go flat and hard, but fairly easy to bring back, just keep on top of it with some light cleaning- same theory applies to leather, if it's glossy- it's dirty and leather creams just add to the soiling.
-
23 hours ago, Verner said:
Looks superb. Who did the Alcantara Lid on the Centre Console?
Excellent job.
Best wishes,
Verner
Thanks mate.
Had Royal Steering Wheels do all the alcantara trim for me,
-
 1
1
-
-
Centre console collected from the painters, just leaving me a bit of machine polishing to refine and some PPF to the vunerable areas.
Pleased with the outcome.


-
 1
1
-
-
14 minutes ago, 987RG said:
Thanks for all the comments/thoughts around removing the dent. Something that I'd like to investigate further once things start to return to normal. Any recommendations for dent removals in and around Northampton would be welcome. Will upload some close up photos of the dent.
Will ask one of my colleagues for a PDR guy in that area for you.
-
39 minutes ago, bally4563 said:
Definetly remove able but you would need to take out door card etc
A lot of the PDR guys now pull the dings from the outside when access is limited. As long as the paintwork is original, it's not an issue doing it this way.
-
1 hour ago, 89rallye said:
i am not sure about around the gear stick ,maybe paint it too

Nice updates mate, mines a manual but didn't get the shifter surround painted, you don't see much of it on the manual though. Think yours looks fine with the contrast.
-
1 hour ago, 89rallye said:
a job i am not rushing so just a quick pic now i know how. this is for @detail1 😃

Your just teasing me now mate 😄
Looks great!!! Desperate to get mine back now.
-
 1
1
-
-
23 hours ago, Davey P said:
I finally made a start de-badging the boot lid this afternoon, and quickly realised what a pain it is to get the horrible glue off... I've not finished yet, the badge is off (and definitely staying off) and most of the glue residue has been removed, but the last bits are proving to be annoyingly stubborn! I will go back to it tomorrow...
Trade tip- soak some make up pads in tar and glue remover, place over the adhesive and leave for 20 mins or so, the adhesive will then simply peel off. Same applies for old wheel weight adhesives.
If you try scratching it off with your finger or a scraper you will only mark the paintwork.
-
1
-
-
Good work 👍 Messy job isn't it, keep finding black flock dust in the door shuts some 2 weeks later.😄
-
Replaced the waterpump and low temp thermostat today, went back together a lot quicker than removing it 😄
Fitted the newly rewebbed seat belts.


-
1
-
-
Looks well mate, nice one 👍
-
3 hours ago, 89rallye said:
@detail1 love seeing your posts mate, wanted to ask you a work related question, i have a steamer and was thinking of using it on the leather seats as i think they are very shiny, any thoughts?
Cheers mate 👍
It should be fine, I've not tried it but have seen others cleaning interiors that way. The shiny leather is just a build up of dirt and oils, so it should clean it well, obviously just be careful not to scorch it or over soak it- steam and wipe away moisture.
-
1
-
-
Few bits done this week, front tuning forks and ARB bushes.


New arch liner bolts and a bit of tidying up.


-
On 4/15/2020 at 11:14 AM, 987RG said:
I’ve been meaning to get round to cleaning the seats and steering wheel since getting the car last November and finally got round to it on Sunday.
I do not think the seats and wheel have ever been cleaned as the seats looked grey (actually are black leather) with a layer of “head fat” (Sweat marks) on the head rest area and the steering wheel had a thick coating of “hand fat” around the rim 🤮.
I started with fairy liquid diluted with warm water in a spray bottle ( I know, maybe a bit extreme). Sprayed this on and then used a soft brush to agitate the dirt, quickly wiping off with a cotton cloth (old t-shirt). This brought back the black but left the seats with a Matt finish.
i then used autoglym leather cleaner to go over everything once more, rubbed in with a polishing pad, before wiping off with a damp cloth (autoglym cloth came with the leather kit). Finally applied autoglym leather balm to the seats, door cards, steering wheel, gear lever and handbrake shroud.
Next thing to do is remove the seatbelts and get them sent off for new webbing....The leather shouldn't be shiny, should have a very low sheen. Shiny leather is generally dirty and full of oils.
-
1
-
-
11 hours ago, phazed said:
Yep. New tuning fork arrive today but won’t fit till tomorrow .
You can see the tuning fork and coffin arm that were fitted to my car with the new tuning fork in the background. New coffin arm is already fitted to car. See the large gap that was taken up by a thick washer. The old tuning fork was clamped up until the metalwork bent to shape!

What/where did you source the tuning forks from? Been looking to do my fronts and keep looking at the E-Porsche ones on ebay, claim they are off the same production line as the leading German ones and seem a good price.
-
7 hours ago, Grizzlee said:
Cleaned the throttle body as the tick over was a little lumpy, was going to clean the MAF too, but non of my torx bits would fit the screws. Maybe different from the 986 which fitted no problem?
Think it's a funky torx bit, couldn't get my MAF off either with the anti tamper bits I had. From looking into it I believe it's a 5 point anti-tamper TS20 or TS25, regular torx bits are 6 points.
-
29 minutes ago, 89rallye said:
@detail1 that's another great job you have done, do you just go over the old flock or do you remove it before hand, your user name is perfect for you by the way 😀
I keyed the areas which were bare rubber with some wet and dry. Then just applied the glue to the areas missing the flock, then re-flocked that area.
Got told off many years ago for using my detailing business name, so changed it to this 😄
-
18 minutes ago, pgk188 said:
Look at floc-king.co.uk it's a little cheaper there.
13 minutes ago, pgk188 said:Did you go for the black or anthracite kit? Thanks.
18 minutes ago, pgk188 said:The kit on eBay is from Floc-King,
Black 👍
-
3 hours ago, Nick_McUK said:
I still need to do this....bought all the kit never did it though
")
You need 24 hrs for the glue to fully cure, so thought it a good time to do whilst the doors can be left open in the garage overnight.
-
3 hours ago, 1973mjg said:
I didn't know that was even possible to repair. Looks good, is there a kit that can be bought to do this?
https://www.ebay.co.uk/itm/264163164957
It's quite a messy job so best to sheet up the door opening, it's not a perfect solution but far cheaper than new seals.
-
Had a go at re-flocking the rubber window seals where they had worn back to the rubber over the years. Was worth a go at £20 or so. Would have probably turned out a lot smoother if I had flattened the whole lot- instead patch repairing. Once the window closes it looks more uniform.
-
1
-


What have YOU done to your 987 today
in 987
Posted
Strange, replaced all my bulbs for led and no warnings or failures. Had Halfords led sidelight bulbs in for about 2 years. Only issue I had was with the quality of the eBay interior bulbs, found the footwell bulbs emitted purple spots from the diodes, so replaced with Phillips capped ones.