


timbobalobox
-
Posts
193 -
Joined
-
Last visited
-
Days Won
1
Content Type
Profiles
Forums
Events
Store
Posts posted by timbobalobox
-
-
Project 387
in 987
On 10/17/2023 at 12:01 PM, JonSta said:Zacly. I wonder if the 5.0 would know enough to be bothered to run the plate and see the actual reg year of the car.
I keep a standard set of plates and screwdriver in the boot just in case - if doing a drive out (or for the MOT of course) I’ll swap them back to white/yellow
Generally as the car looks quite old I’d have to have been deserving of the attention if I had not changed them
I’m certainly not doing it to obscure for ANPR or anything like that!
-
Project 387
in 987
On 10/16/2023 at 8:49 PM, El Vikingo Tropical said:O have some questions!
With the experience you got now building this car, imagínate you decide build a second unit!
1. How long time do you think it would take you building a second unit?
2. What would you not make at the second unit?
cheers
Jan
Hi Jan
No worries!
A huge amount of my time was spent working the wiring out and problem solving, so I think I could possibly knock at least a couple of weeks off the total time.
I don’t think there’s much I wouldn’t do again to be honest - definitely be more careful not to break things being clumsy! I’d probably wire the resistors/ballast in a more structured position ie instead directly inline near the lights, I’d mount a panel in the frunk for easier future access.
Hope this helps, let me know if you need anything else!
-
Project 387
in 987
23 hours ago, Menoporsche said:Sorry Timbob
")
Not a bother! All chat is good 👍
-
Project 387
in 987
25 minutes ago, Menoporsche said:1. Change your My Ride, That Ain't No Volvo
2. Put your approx location in your Location, if you want local help!
Still waiting for a good Calendar quality pic, they are just nice snapshots so far
But I hear you've had summer showers recently...
That popped body looks annoying, I hope you can get it properly fixed (ie doesn't pop again a couple of weeks later) with little trouble. My old kit car had a side pipe exhaust, the bracket kept snapping until I put something far more substantial on it - seems the forces were a lot more intense/damaging than at first sight.
Updated!

There are some lovely spots in the Cotswolds that I keep meaning to get to - definitely need to wait for the weather to get a bit better!
I don't think it should be too bad to fix - biggest issue will be access to get enough adhesive!
-
Project 387
in 987
A couple of pictures - I was planning on getting some better shots in the country of it, but the weather has been so bad recently!

Quite like the fly-splattered look 😄


A bit of an issue... Seems the body flexing has popped at the bottom - shouldn't be too much of a problem to fix, and fingers crossed it shouldn't need much touching up

Back in the garage it's popped back in on it's own accord - just need to get some adhesive back in behind it.
Quite fancy getting one of these as the company can create them for your car from a decent side profile picture

Maybe the next project...
(based on an original beetle)

I'm still struggling to get the errors out with ballasts/resistors for the lights - wondering if I need PIWIS? Happy to travel to someone if they have access for some beer tokens!
-
 2
2
-
-
Project 387
in 987
On 6/25/2023 at 12:14 PM, JonSta said:Haven't had a what it's like to drive report.....
Getting better! The strip at the bottom of the window took a bit of getting used to (but having had a Cerbera years ago the visibility is still better than that...) I also bottomed out on the front on the some of the roads around the area when driving 'progressively', but that's not really a huge surprise due to the suspension being 10mm lower at the front - I think it only caught some of the plastic air dams that are flexible anyway, so no damage done.
I still need to sort the sat-nav as I think I disconnected something, and the air-con is no longer blowing cold, then other than the few error codes from the lights changing we're all good 👍
-
1
-
-
Project 387
in 987
On 6/24/2023 at 10:35 PM, ½cwt said:That is @timbobalobox's car. Check out the reg plate in pics further up the thread...
Twas me
It was a pistonheads meet at Caffeine and Machine with some lovely metal there.
@TGI_J Sorry didn't get to say hi
-
Project 387
in 987
On 6/23/2023 at 4:22 PM, skoosh1970 said:....any updates on this Timbo.....it's been a while..?
Had 10 days in Icmeler and as good as my holiday was I couldn't wait to get back and drive my 2.9, and, she didn't disappoint as she nears 158k !!
Nothing exciting I'm afraid! Have been to a couple of meets - the first few drives you could tell it's been sitting around for a year, each drive has got better and it's feeling back to its old self again!
There's still a few bugs I need to sort, but nothing that stops it being driven thankfully
Pleased you had a good trip 👍
-
Project 387
in 987
3 hours ago, skoosh1970 said:Way over the top and not a patch on Timbo's....................!!!!!!
3 hours ago, JonSta said:Not as nice as yours either....
Thank you - I'm flattered!
This must have been done by Iconic themselves, as the only other supply only one I know of is all black - means the bodywork will be really nicely finished as their work is top notch
-
Project 387
in 987
8 hours ago, Bike Loon said:It’s certainly a strong price!
-
Project 387
in 987
8 hours ago, JonSta said:Have ever tried cleaning that fire suppressant powder up if it goes off? Friend of mine had one go off in his track Impreza. Afterwards he said he wished he'd just let it burn.....
Ouch! Hadn’t realised that, or even considered it to be honest.
I only plan to have it when at home really, due to its proximity to the wooden mezzanine if something happens.
Good to know though, appreciated 👍
-
Project 387
in 987
8 minutes ago, Toddie said:Which Porsche club AGM are you attending, Cornbury House or Bolton Abbey? If Bolton Abbey I look forward to meeting you and you great looking car.
Cornbury House I'm afraid! Maybe next time 👍
-
Project 387
in 987
1 hour ago, Terryg said:When you say it looked weird with the roof up, is that because you hadn't seen it that way in ages?
Absolutely, but also from the new height of the doors makes the roof a look a bit 'squat'. To be fair it's not too dissimilar from the original, so maybe it's not a bad thing!

You can see the orange fireball under the bonnet - I had never heard of them before, but the electrician recommended them. The idea is if they get to 70deg they explode with a fire suppressant and with the battery on a trickle charge it gives a bit of security should something go wrong.
Bit of a better view

The cables in the windscreen are the heater cables, which I'll connect soon. Or... connect the radio to them for a better aerial! (I can't see it being used too much in weather that necessitates a heated screen
)
-
2
-
-
Project 387
in 987
Thank you everyone
There are still lots of bits and pieces to do, but it being taxed, tested and insured feels like a huge step in the right direction! I've got to whip the engine cover off today as the power steering sounds a bit 'whiney' so I think the fluid is low.
Big thank you to those who recommended iCarsoft - I had it delivered yesterday from Amazon which cleared the error codes a treat (the electrician couldn't get back until Monday!). It'll be handy to have in the future when I have to take the doors apart again 👍
It's still due a final polish by the painters which I'll get done in the next couple of weeks.
I'll get some nicer shots done shortly (hopefully tomorrow if the weather holds out
)
-
2
-
-
Project 387
in 987
As the MOT was booked it was a bit of a rush to get everything done... This included taking the door skins off and re-fitting the airbags, and whilst they were off re-sited the driver's side door top panel and glued. Also tested all of the lights, fitted the latch cover etc etc
Windscreen was installed yesterday and thankfully it fitted like a dream!

It looked quite fiddly and seeing as you only get 7 minutes to work with the adhesive, I'm pleased I left this to the pros!
Wipers on and working

I've since adjusted them so they sit a bit lower.
Normal plates back on for the MOT - I actually don't mind it as much as I thought I would!

It's back to the painters tomorrow (Saturday) to mess around with the gaps a bit more and to shave a bit off the spoiler (then repaint)

Very satisfying to cross these off
This was the list of jobs that I made when I got it back beginning of April

Then off it went this morning for the MOT...
...
...
which it passed 😎
I got a call to go and collect it sharpish as it started pouring with rain and they didn't want to put it outside (didn't realise it had a roof!) It looks a bit weird with the top on
but kept me dry on the way home.
So tomorrow is a few (a lot) of finishing touches, a good clean, then should be able to take it on Sunday to the AGM 👍
Come and say hello if anyone else is going
-
7
-
-
Project 387
in 987
18 hours ago, McDonald said:And hopefully the value change too! You need an agreed valuation, surely? If you write off your 2005 Boxster, you'll be lucky to get more than 7K.
I think some insurers with offer a GAP type protection for a premium which I’m wondering about doing, with an agreed value of what the others sell at from Iconic - I need to have a proper look into it!
-
1
-
-
Project 387
in 987
19 hours ago, Bike Loon said:At £140 I might give that a go - seems really good value!
Thank you👍
-
Project 387
in 987
1 hour ago, ½cwt said:Is it worth you investing about £200 in an iCarsoft or similar OBC which can clear airbag, ABS and a few other codes as well as the normal OBC engine/emissions codes? Saves the auto electrician coming round and you can work to find whit's causing it by clearing in as you work the fault.
Hadn’t realised that 👍👍
I thought it was only Durametic/PIWIS that would do it, and they’re around £500 (plus I’d need to know what I’m doing)
I’ll have a look, appreciated
-
Project 387
in 987
30 minutes ago, Menoporsche said:Will it still say Boxster on the V5?
Yep - I have notified the DVLA of the colour change though! 👍🏼
-
Project 387
in 987
Thank you all for the kind comments
On 5/5/2023 at 1:31 PM, skoosh1970 said:Are you thinking of painting the centre console trim / transmission tunnel body colour..?
Potentially - I've been thinking of ways to incorporate the interior to the outside, and I think this could be a subtle way of doing it 👍
On Friday the electrician came over to clear the codes - however the airbag one has come back on so we think both door airbags might have a loose connection. The cards need to come off again anyway as it's throwing up an error to do with the door module (I also bonded the door strip too close so it fowls on the window 🤬🤬 - teach me for just assuming the profile underneath was correct 🤦♂️). I also got round to fixing the radiator vent with copious amounts of epoxy!
One of things I wanted to get done was line get the boots trimmed out again as it feels one step closer to completion! Decided taking the bonnet off was the best way;

It's been nearly a year since I took it all apart so it's been a puzzle to get back together!
Whilst the lid was off drilled and mounted the wiper jets - I plan on replacing these with chrome ones, but I just needed to get them working for the MOT.

You could see a small strip of fibre glass body beneath the rubber which is usually painted black - as you can see the weave through the paint, instead I cut a thin piece of leather and stuck this round which neatens it up a bit;

The top part is under the battery cover so is well hidden.
A bloody fiddly bit! As it goes I need to do some more work around the latch cover so didn't attach the leather yet;

Bonnet off, ready to be lined - I tried in situ, but it was making life too difficult for the sake of a few bolts

I cut a piece of card as a template, mounted the leather to this, then glued it to the lid. I've since tidied the edges which needed the rest to be dry before re-stretching. Note patented weights
")

I was having a bit of a mare with it all today, but was cheered up by finding these

Now the radiator vent is fixed, on went the arch liner and wheel, so I could spin it round in the garage again

And back on the floor, peaking out 👍
Then with a break in the rain;

To be honest the couple of days it's been a real slog with one thing or another going wrong, almost wishing I never started

Then looking from this angle in particular made me think it might have been worth it...

From the front, with the lights I put in on Friday;

Before dropping it to the floor I needed to tidy some of the wiring and get the body liners on - I always struggle with the perspective in the photos, as that is exhaust is definitely central
I'm looking for different options for the tip (I'll also get it made up properly instead of a flexible piece), but for now I actually quite like the simple bean tin 😎

There were a few codes that came from it being off of it's wheels for so long and also the battery being disconnected/reconnected so many times, so the steering sensor needed recalibrating. This is as simple as driving a few hundred yards - I waited for a break in the rain and went up and down our road. It was great to be driving it again! It warmed up a treat and sounded great. Unfortunately I couldn't go much faster than 10 mph as it's a cul-de-sac 🤣🤣 Regardless, the codes cleared 👍
Got it back in the garage and put the bonnet back on, after getting the frunk liner and protector in; it still needs a bit of fettling around the top where I'm not 100% happy with the lining, but it's getting there and starting to look like a finished car again!

Windscreen is due to go in on Thursday this week and the electrician is hopefully coming back the same day to clear the airbag codes once I've checked the connections, so all being well MOT on Friday and if (BIG if) it passes I'll give it a run to the Porsche AGM on Sunday.
Have a good week all
-
4
-
 1
1
-
-
Project 387
in 987
9 hours ago, ½cwt said:Small point, but are you keeping the calipers red? Not quite a period detail.
I wondered if I should change them, then assumed I wouldn't need to as the new wheels would cover them - however you can see them through the gaps!
-
Project 387
in 987
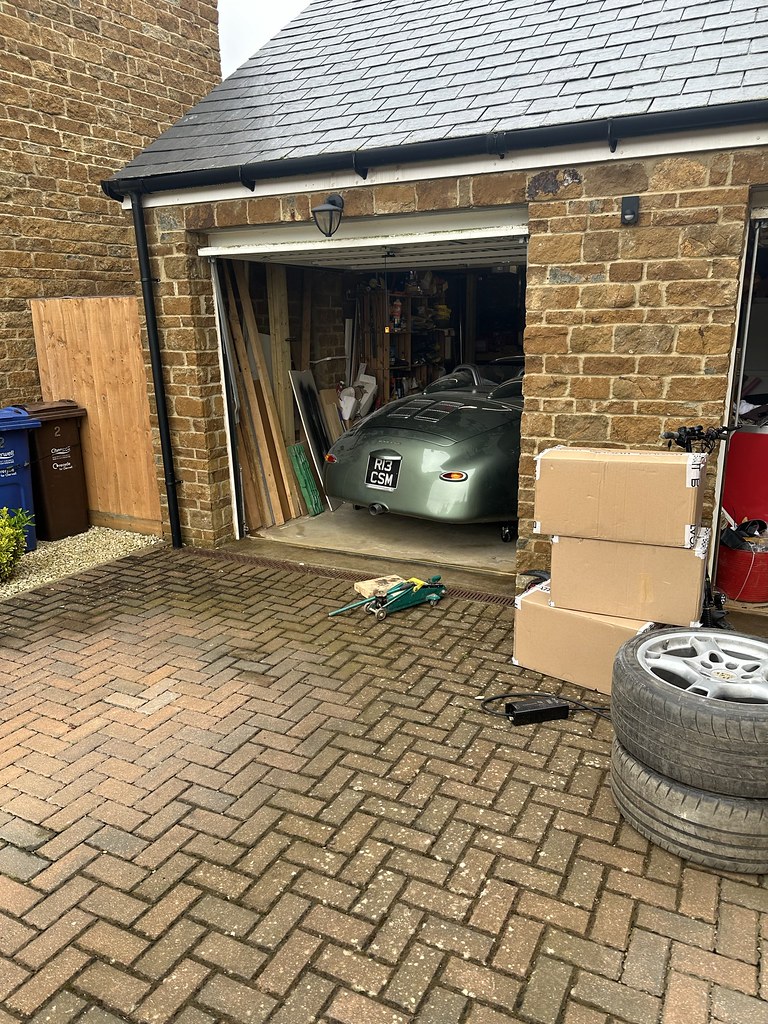
Bit of an update for this week so far...
Got the tyres from Costco on Saturday (full set of PS4 installed for £800 seemed pretty good), which meant I was desperate to get them on! A few things needed doing first, such as arch liners, fixing the radiator vent pipe I broke, fuel pipe etc
Fuel pipe out (10pm on Friday night
) This needed cutting then a new pipe joins the new filler

Also gave the door strips a few coats of paint

... and glued one on to see how it went

You can also see the tape holding the triangles that cover the old wing mirror mounts
Slightly better view, plus a dab of glue holding the side repeater on

Also marked out the logo on the front - it took a bit to get right and match the original as much as possible

and then holes drilled and placed on (not glued at this point) - you can also see the hole cut for the bonnet release lever. That took a lot of working out, but this seemed the best solution as it's the only place you can reach after it pops the first bit open. I've got a sleeve to cover this as well so it doesn't look so home made! I'm also going to line the hole with a grommet

This is fuel pipe that joins the two together - it's mounted a bit closer to the body to follow the original so the liner fits better.

Drain holes drilled and metal pipe inserts in for the boot lid

A quick check to see how the wheel looks (without the centre)

And then with a few more bits and pieces taking up a load of time (as usual
), couldn't help but get all of the wheels on tonight and back on the ground! (almost)

A better view on the side vents which I picked up today - one needs a bit more sanding/filling/repainting to be honest

That's all for the past week - this week the auto-electrician is coming on Friday to clear the codes, windscreen should be installed on Thursday next week, then with any luck MOT the day after... With even more luck it'll be ready for the Porsche AGM on Sunday (not sure if I'll be welcome with something so messed with 😆)
Enjoy the rest of the week all
-
3
-
-
Project 387
in 987
On 5/2/2023 at 4:53 PM, Mattman42 said:Catching up on the updates - possible simple answer is to get smaller Pegasus stickers? those look a little large for where you would like to use them?
I'm still not sure about them - I like the idea of them, but probably wait until it's on it's wheels to see if I'll get some smaller ones.
On 5/2/2023 at 6:49 PM, JonSta said:What about putting the very small mobil horses on the speed humps? On the side just behind the roll bar?
I think this is the best location to be honest, around the side repeater looks a bit cluttered
-
1
-
-
Project 387
in 987
25 minutes ago, BBB said:Sorry if you’ve explained this before, but does the roof still work? I presume you can remove the speedster humps, then does it just operate as normal?
The humps have a quick release pin then the panels are in three sections so all store in the boot 👍 Not quite as quick or convenient as just the original roof unfortunately!
-
1
-


Project 387
in 987
Posted
Bit of an update...
Spent a bit of time sorting out bits and pieces that I've been meaning to do for ages!
Quite far down the list was the sat-nav, but it needed doing and I had been putting it off to be honest. Luckily I had kept the scuttle panel during a clear out of parts I'd removed it, and after googling what the GPS receiver looked like I found it still attached (phew!). Plugged it in, bolted it to the panel hiding the battery etc and after a short drive it was working again in all of it's 2005 glory.
Also wanted to line underneath the removable tonneau panels with some padding to neaten them up a bit - it actually went quite smoothly and with some contact adhesive shouldn't be coming off any time soon!
Finally was the issues I'd been having with the lights - due to the side lights changing to LEDs (the only size bulb I could find to fit the beetle style lights with the right voltage), I needed to add two resistors to stop the car thinking the bulbs had gone. Did this and thankfully it worked") The reversing light was also throwing up an error (LED strip under the number plate), which I then realised I had to add resistors to both sides of the loom because there are reverse lights in both clusters, when I had originally only had put one on - stupidly obvious now when I think about it!
The reversing light was also throwing up an error (LED strip under the number plate), which I then realised I had to add resistors to both sides of the loom because there are reverse lights in both clusters, when I had originally only had put one on - stupidly obvious now when I think about it!
With those bits done (and a good vac out), I think it's pretty much there.
I had mentioned to a few folk at the last Boxster meet that I might stick it up for sale to fund the next project (loft conversion ), so with that in mind...
https://collectingcars.com/for-sale/2005-iconic-autobody-387-speedster-homage
If it goes for it's reserve (or hopefully more!) I will be able to look back with fondness on the project - it's honestly been great to have shared the journey with you guys, and to have had so much interest and support. If it doesn't sell then you'll see more of me in the Boxster in an old dress at the events in the future
Have a good weekend all 👍