


timbobalobox
-
Posts
193 -
Joined
-
Last visited
-
Days Won
1
Content Type
Profiles
Forums
Events
Store
Posts posted by timbobalobox
-
-
Project 387
in 987
11 hours ago, Terryg said:Wot, no weekend update? 😭
I'm flattered! It's been great for me to be updating this as I go - otherwise it seems you can lose your progress and forget lots of the detail.
11 hours ago, ½cwt said:Fibre glass dust and sweat in hot weather are not a good combo (I used to trim that stuff as one of my first jobs, very unpleasant), plus unless he got that sheet sorted for his garage roof it would have been rather hot!!!
Come to think of it, no update???
I've obviously only been doing a small amount of what you would have done as a job, but can testify it's pretty nasty and can be really itchy on hot exposed skin.
Still nothing on the garage roof!
10 hours ago, Terryg said:I was thinking it may be a heat issue, I mean what else could possibly be more important?
My other half booked a weekend away for me as a surprise for my birthday and I was way too hungover to be trusted with an angle grinder yesterday when we got back 🤣
I'm just getting to my busy period at work now (so a few weekends of precious car time taken up 😪) but trying to fit it in at night.
A teeny tiny update however...
I thought the clam was ready to bond but figured I should sort some more of the wiper mechanism first as it'll be easier with more space - I also decided to spray the underside black where it meets the windscreen (holes at the top). You can also see the new fuel filler
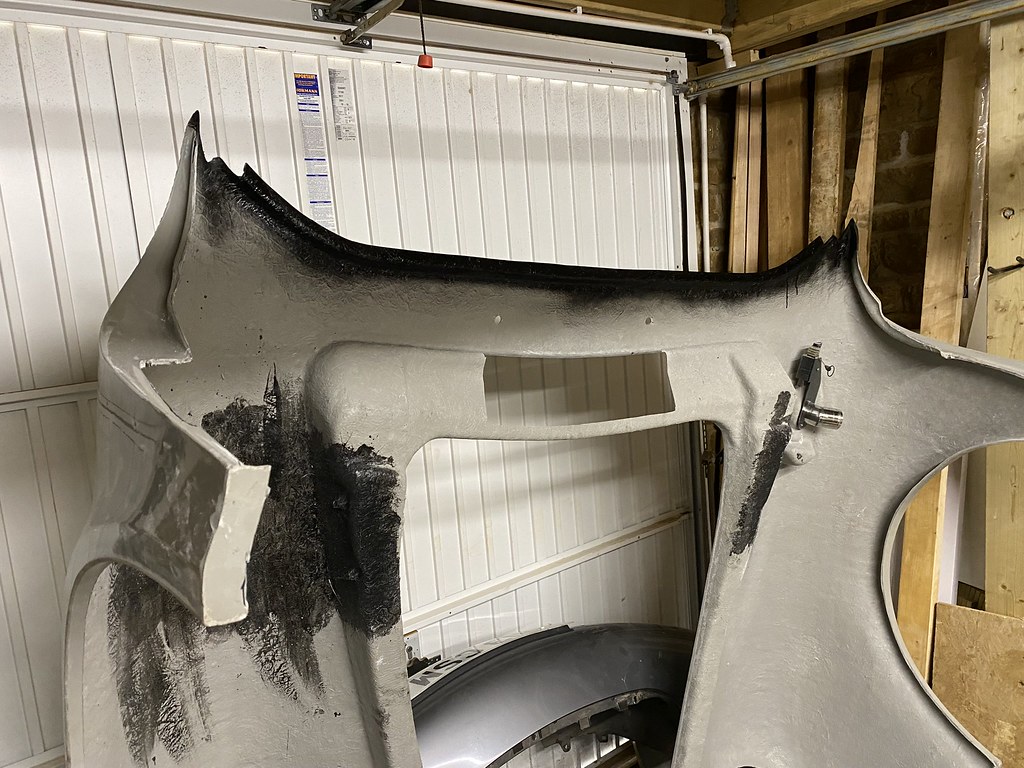
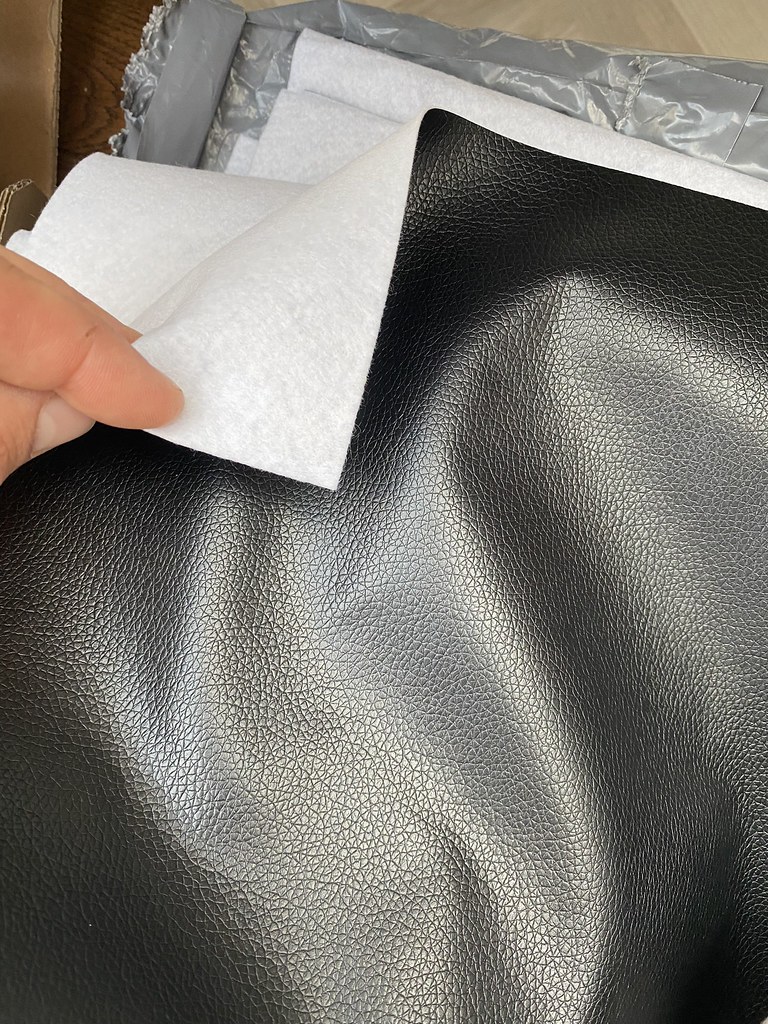
I then decided it'll be better to line that small top section (maybe 30mm) with leather-effect vinyl that will match the seats and ultimately the speedster tonneau (just the flat part, not the humps which will be body coloured)
Closer up picture of the fuel filler pipe. As mentioned, it incorporates the existing lid and locking mechanism (actuator at the top). Holes cut out below for the hinge

There is so much left to do, but it's nice seeing it back on the ground again (even if my back won't agree)

A bit of a better view of the extended washer fill pipe - I need to cap the end of the other tube that used to feed the headlight washers
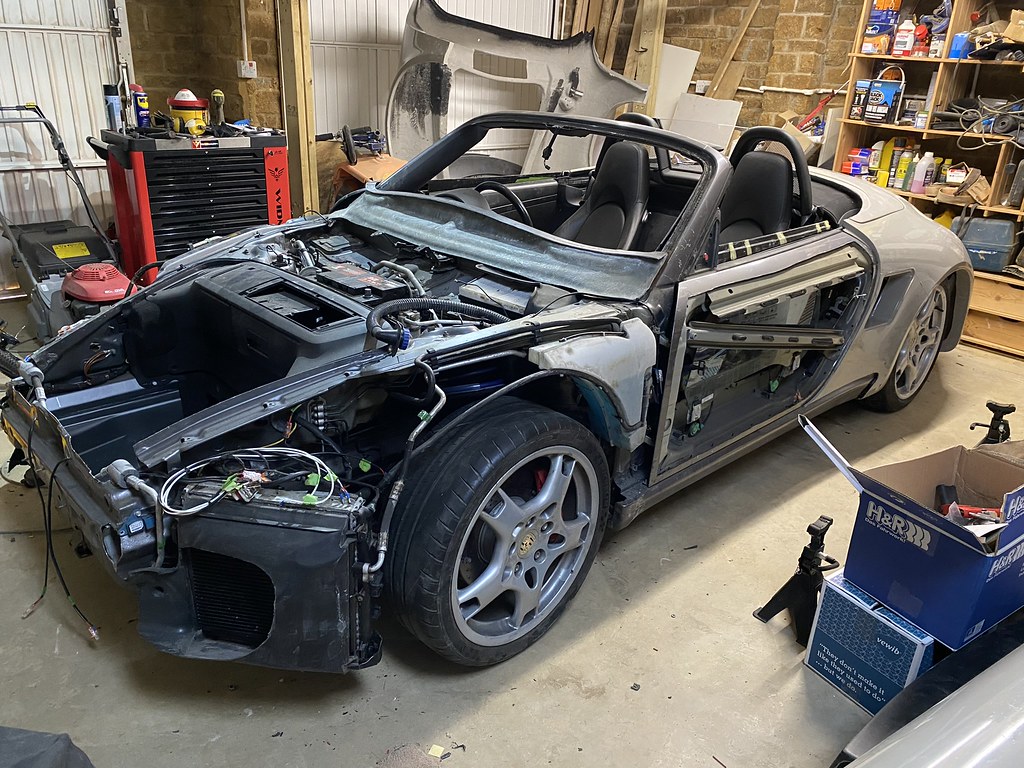
These shots also highlight the wider track of the rear - looking forward to filling them with some new rubber 😎. It'll be back in the air again soon to get the arch liners back in, after I've done some preventative maintenance.
I still need to suss out how to stop the car thinking there is a problem with the headlight levellers... I'm not sure if a ballast would fix this (like it did with the side repeaters), or I'll need to find someone to code them out somehow. Any ideas are welcome!!
So not the biggest update but I hope a few evenings over this week will see the front clam on and bonded, then I can sort the door mechanisms, gap the doors/boot etc and then...... off to be painted!
Enjoy the weather all 😎
-
 2
2
-
 1
1
-
-
Project 387
in 987
12 hours ago, Wish said:Should the car be carrying it’s own weight (wheels on the ground) when the panels are fitted ?
A very good point - bonding the clams near the doors is fine to do on axle stands as it’s a really rigid part of the chassis, then as soon as the front clam fits I can drop to the wheels to bond the remainder. There’s quite a bit of flex in the fibre glass shell so looking forward to firming it all up 👍
-
Project 387
in 987
44 minutes ago, Menoporsche said:What is your garage roof made of?
If you can find a couple of old white bedsheets and chuck them over, they might reflect a fair bit of the sun before it heats the roof, thus lowering the indoor temp overall.
👍
It's dark slate which was showing the heat haze yesterday when I was outside! I might give it a go if I can find some sheets
-
Project 387
in 987
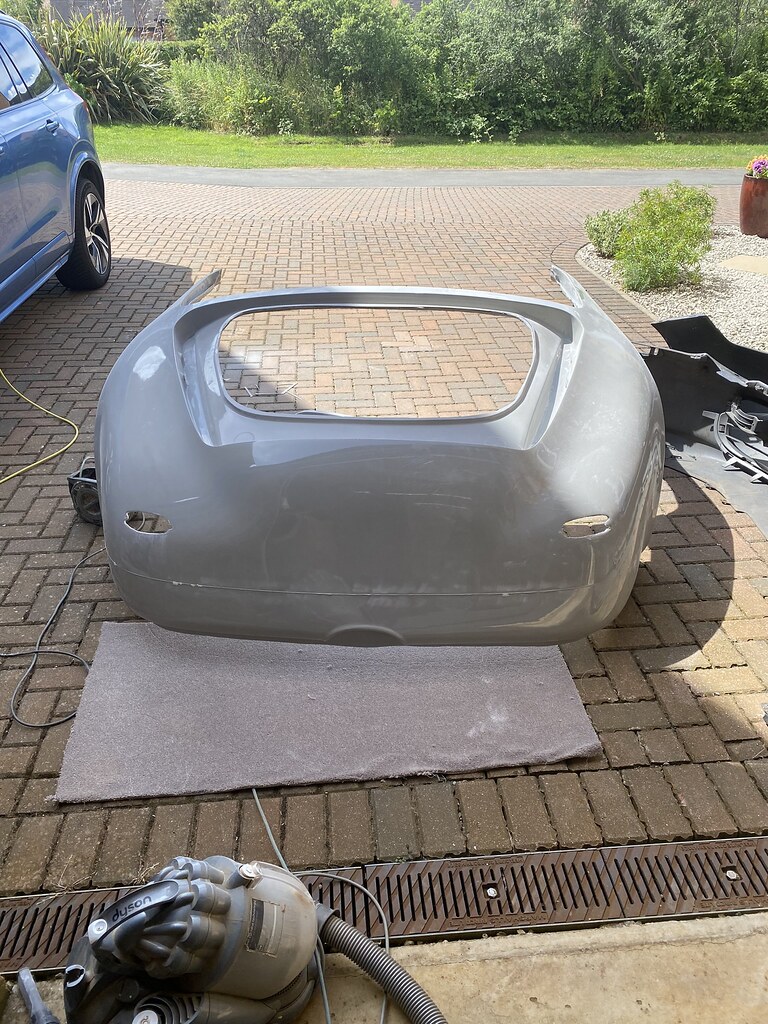
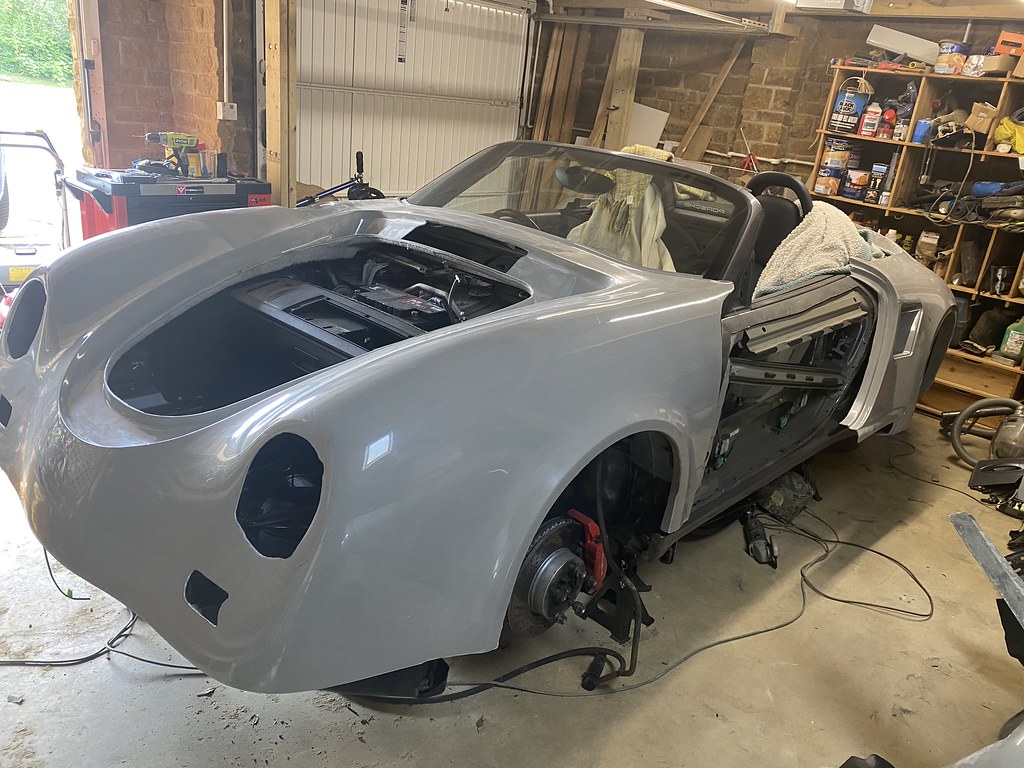
A bit more this weekend - the rear clam is now bonded on (just at the door end as the rear needs seating correctly when gapping the boot lid). It was bloody hot work!
Now onto the front... I put the bonnet in to check the gaps as I go

As you can see it's sitting a bit high, so I've marked everywhere to trim and will take it off to do so, mitigating the amount of dust in the garage! You can just see the trim on top of the door (yellow marking tape around it) which raises the profile inside the car.
From the other side - this shows that it's not sitting right a bit better. It's a painstaking job marking up the clams (especially in the heat) as they're on and off so many times.

The gap between the door and rear clam doesn't look quite right in this picture either - in reality it's almost there and is made worse by the light. You can just see the new fuel filler in shot too (also below), it's a clever design that uses the original flap. I managed to break the old hinge removing it which is quite common apparently - £15 to replace so not the end of the world.
It looks much nicer with the front valance on, but it needs to be off to remove the clam. The wiring hanging down are for the driving lights, like this;

I think this is Slate Grey too, which is the colour I'm going to go with - it's the same as the Walter Röhrl one earlier in the thread 👍
So it's getting there... however I've still got a mammoth to-do list that frustratingly has a load of fiddly time-consuming bits on! Still, it's great fun and an enjoyable project so far.
Enjoy the sunshine all 😎
-
1
-
-
Project 387
in 987
Managed a couple of hours tonight - the rear clam has had to go on and off a load of times to get the lines right, trimming a bit each time... Painstaking (and damn awkward) but getting there slowly.
Door skins tacked on with fast drying epoxy and masking tape, so I can use this as the datum for the clams

Then as usual got excited so put the boot lid, tonneau, spoiler, speedster humps and tyre on! Panel gaps line up nicely once pulled straight. As the wheel has no load on, the gap is way too big for the arch and will sit much more snugly. A little more tidying up around the arch and should be ready for bonding on soon - the point of no return! Then onto the front.
Finally sorted out the side repeaters which needed a ballast as mentioned. Also worked out the problem with the side lights - just the door actuators and front indicators playing on my mind now!
-
5
-
-
Project 387
in 987
Another week gone by, and another feeling of not having achieved much! Managed an hour or so through out the week, then a good chunk today.
The time has mostly been taken up by wiring, changing the springs and getting the body ready to go on.
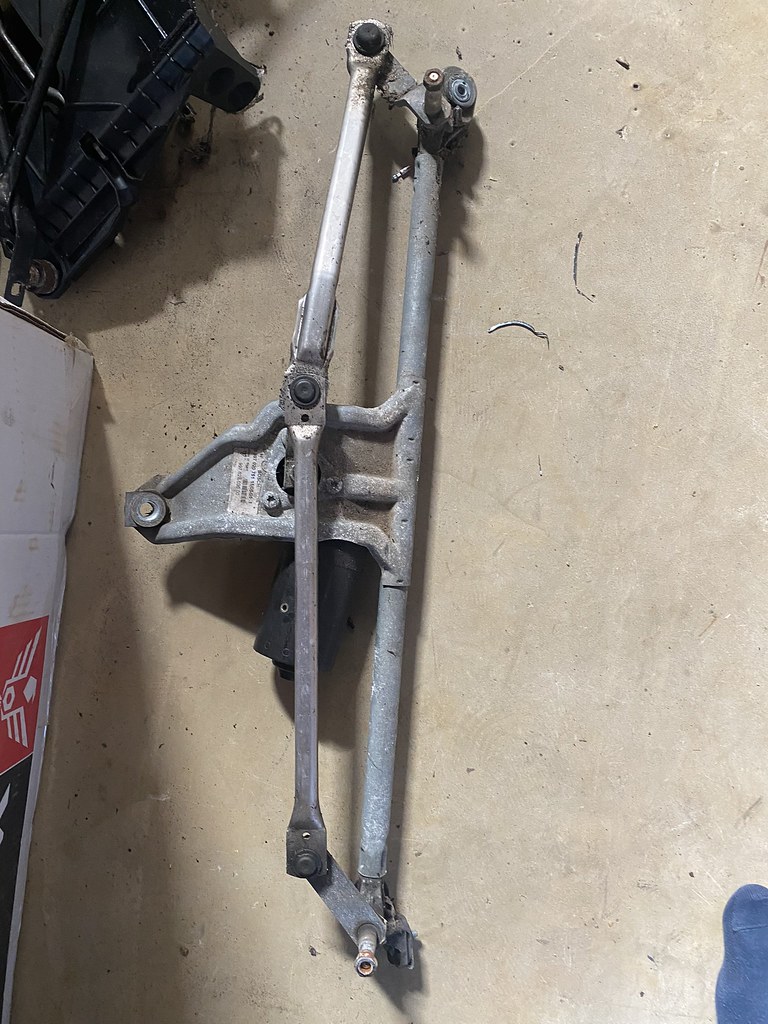
Striped the old wiper mechanism off - due to the new screen a new one is needed. I've got this now from Iconic, just need to get a photo!
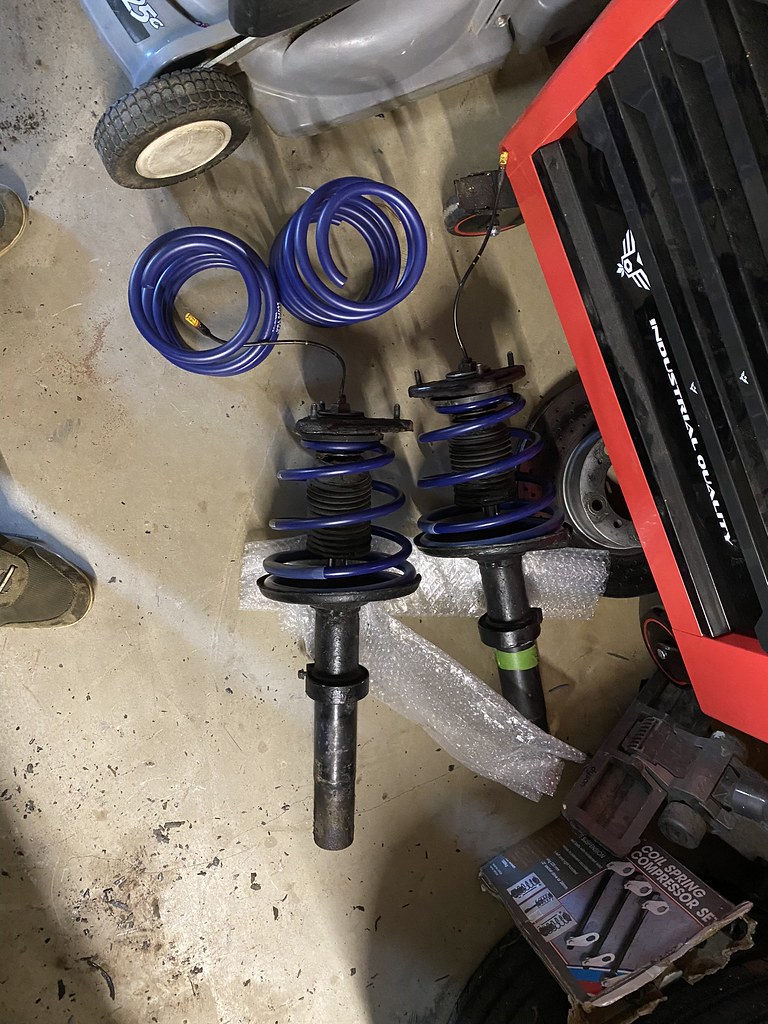
Springs finally changed (and now back on the car) - the top plate was seized on, so I had to drop them to a local specialist who managed to get them loose.
Managed to snap the head off the bolt that holds the brake line to the hub, so needed to drill/tap a replacement 🤬
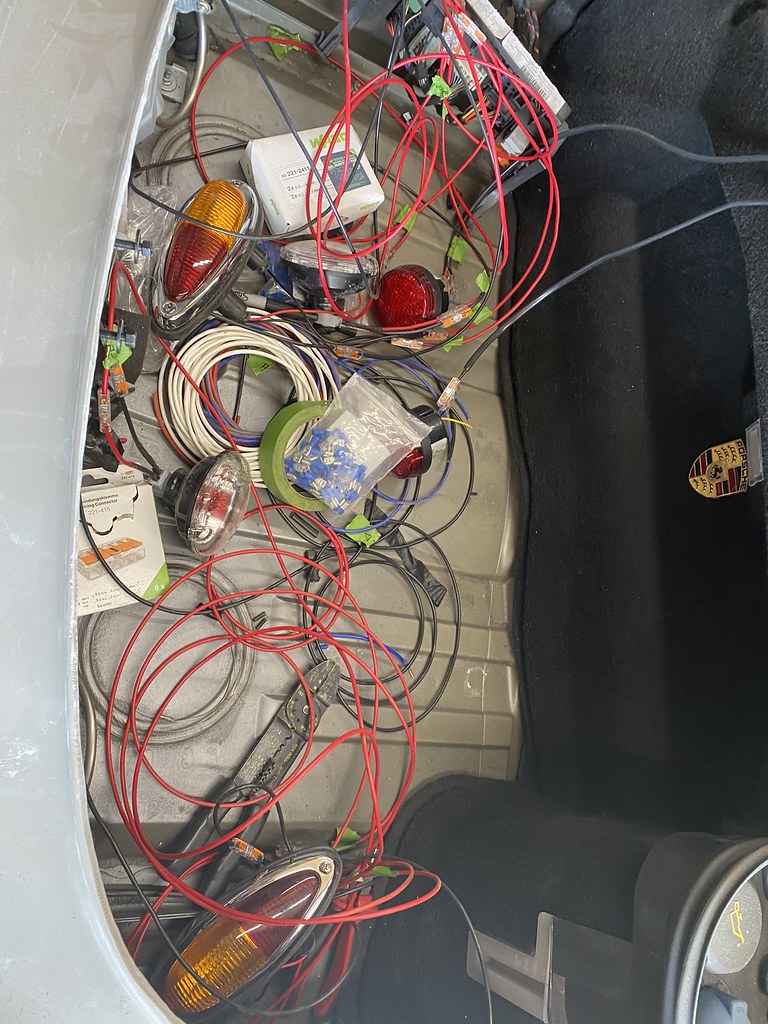
An example of the little things that take time to make up - off the shelf light assemblies needing modifying so I can wire them up (this is the reversing light - there is an identical one for the fog)

Windscreen valance getting filled/sanded/sprayed

Trimmed the new clam down where it came out of the mould - this is duuuuuuusty work!

Cut the vents out (I cut rough, then tidied up with the sanding disc)
Took over the drive as it was a nice day!

The bit just below the front clam is a valance that bolts to the bottom (it's currently upside down and needing the vents cutting out).
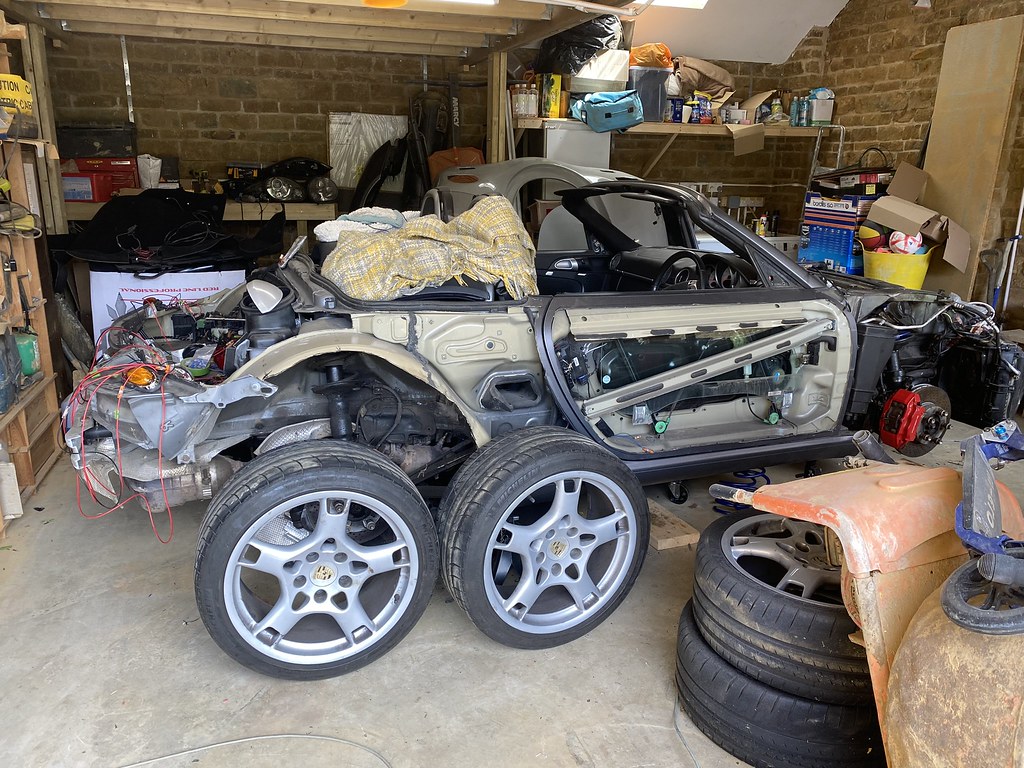
A very naked Boxster!
Tested the lighting this morning, and most of it works... Need to go back to fault checking for the side lights and indicators (which I think I need a ballast for the side LEDs). Looking forward to getting this a bit more organised!
Sooo close! Just needs a touch more trimming and it should be a nice fit.

I still need to wire up the new door solenoids (takes a feed from the window mechanism), but as the door skins need to go on first to line the front and rear clams up, and having them off makes it a lot easier to do, I'll mask the surfaces and use a small amount of adhesive. I'll be able to peel it off and sort the wiring later.
Also picked up the speedster humps and the last of the brackets - it's slowly coming together now. As it's fast approaching my busy time of year for work, in a perfect world I'd like the body on and ready to paint in the next couple of weeks so I can leave it with the painters. Then have it back just in time for the rain in autumn 🤣
Have a good week all! 😎
-
5
-
1
-
-
Project 387
in 987
As ever, not quite as much done today as I would have wanted to - the noticeable progress has definitely slowed too! Lots of little fiddly bits that are time consuming, but don't look like much.
Windscreen was taken out on Friday night - I was impressed it came out in one piece, so I may try and sell this (if there is much of a market with most people going via their insurance when they need a replacement).

I also started to mark out/pre cut the screen valance - it's quite tricky to get a decent cut by going slowly as the grinder gets so hot it melts the plastic, which then cools leaving a bad finish. Ended up cutting shy and using a dremmel to clean up. The fibre glass valance will be sanded/sprayed black (the finish is really quite good already). I *might* try and cover with leather to match the dash, but seeing as the original part I've cut is plastic, it might not be necessary.
With the valance in (rough) place) - this will be bonded down once I've applied the finish. Wiper mechanism out too. You can just about see the flexible pipe on the top right - this is an extension to the washer fluid reservoir filler as it needs to be further into the frunk.

You can also see where I'm reshaping part of the wing for the angled fuel pipe to clear - it needs a bit more doing to get it right. Also begun to tidy up the wiring going to the new side repeaters having spliced it into the front loom. Plus the trusty Dulux tins holding up the brake caliper

Bit more cutting the front out to ensure the new clam sits snugly - you can also see the airbag sensor (blue with a yellow wire) with a self tapper as this used to mounted under the front wing.

Spaghetti junction! I'm using wagos to test the circuits then will solder/heat shrink once all working. This covers the front indicators, side repeaters, front dipped/main/side lights and also driving lamps (with the main beam) 😎

Drilled and tapped door restrictor spacer on

And more cutting/shaping! This is roughly the shape and will reach the new wings (you can see it's a wider track than the original), and just needs neatening up

That's all for today - might get some time tomorrow evening to mess about a bit more with the electrics as I'd like these done and tested
-
3
-
-
Project 387
in 987
23 hours ago, Wish said:Will you get a dust coat on the underside in the chosen colour before fitting.
I don't think so to be honest, it's going to be a trial and error method of putting the body on and a while before it can go to paint - once the body is ready for fitting it's bonded to the shell so access could be an issue. Also all of the interior trim/boot liners/wheel arches are re-used so there should be much to see
")
-
Project 387
in 987
43 minutes ago, skoosh1970 said:Been following this on holiday in Turkey this last week, great thread and coming along nicely.. At one stage I thought you may have already painted the rear clam clay grey.... Looks awesome as does that 911 turbo 356...!!!?
It actually looks good in the grey! The finish on the fibre glass is lovely. I'm just off the phone with a painter who is local to me and gets great reviews - I'm really keen to get a nice finish on it, as this is what will set it apart and make it look special as opposed to something I put together 😁
-
Project 387
in 987
10 hours ago, iborguk said:@timbobalobox Just wow, love the way it's coming on, excited for you 😀
Thank you - really enjoying doing it, and trying to find excuses to slope off to the garage whenever I can!
I've got a chunk of free time tomorrow so hoping to get quite a bit more done 👍
-
2
-
-
Project 387
in 987
15 hours ago, Daboy3000 said:Liking that green, will work with the black interior too.
14 hours ago, red rocket said:^^^ love the Green!
To be fair this was my wife's idea - can't even take the credit for it! I think the fibre glass benefits from a bit of metallic fleck in the paint, so it will be a good option 👍
-
Project 387
in 987
2 hours ago, Wish said:100% love this ….
The worrying thing is your making it look too easy.Thank you 👍 I'm only posting the good bits though 🤣🤣 There is many a moment where I'm wasting time, scratching my head, trying to fathom the way to do something.
I have been quite pleased with the progress so far, however I think the hardest is yet to come...
 Apparently getting the body fitting perfectly is a bit of a challenge! I'm hopefully going over to Iconic tomorrow to see how he is getting on with his customer's as it's fortunately at a similar position to mine. Moving the clams around the garage is a pain and whilst not heavy, definitely an extra pair of hands makes it muuuuuch easier.
I still need to work out wiring the door solenoids as they go from mechanical where the handle pulls on a lever on the latch, to an actuator pulling a cable, operated by a new door switch (a tailgate release for a mk2 focus nonetheless!)
-
1
-
-
Project 387
in 987
With work/Father's Day etc I didn't get anything done since the last update, but did a bit more tonight;
Offered up the rear clam as I needed to trim a bit more (hence why its not sitting flat as the where the curved part goes flat in the wheel arch needs to sit under the existing sill)

then stuck the front on too, because well, I got a bit excited
You can see how much higher the front sits above the windscreen - I've got someone coming over to remove/refit the new screen as I took one look at all of the trim I could ruin and decided to call in the pros!

The valance sitting on the top goes on the inside of the screen - I think I'll get this covered in leather to match the dash. Next up is to cut out the remainder parts from the new body (fuel filler etc), finish the electrics and change the springs over.
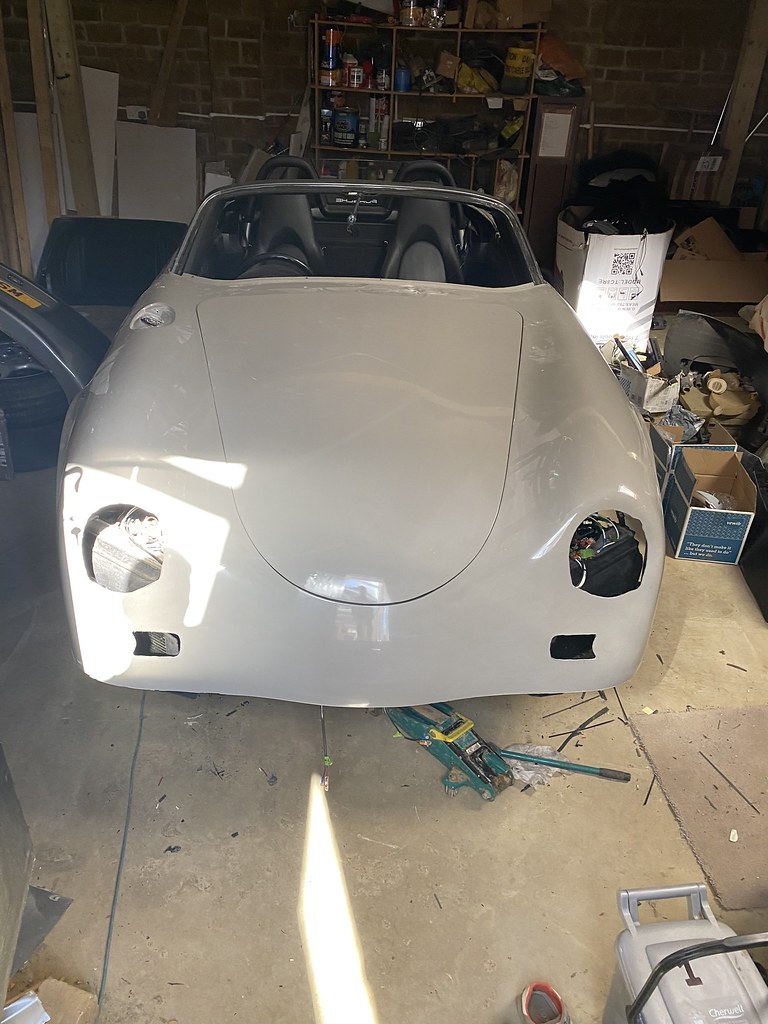
I might be speaking too soon, but fitting the body actually feels quite close
Found this for a colour option - still undecided! Walter Roehrl's 356 (with a 911 turbo engine in 😎

-
5
-
-
Project 387
in 987
Bit more chopping tonight!


It needs a bit more coming off around the wheel arch, but I'll need to place the rear clam on to get the lines right. Near-side is almost done too, but I'm taking it very gingerly due to the monster wiring loom underneath!
-
Project 387
in 987
1 hour ago, Menoporsche said:A question, as I can't remember if you mentioned it in your "enquiry" thread. When you started this, was your Boxster totally fine? Or was there anything (scratched/faded paint, dents, rust etc) that made you a bit more willing to sacrifice it? Old kit cars were based on 70s classics where the mechanicals were fine but the body/subframes had been rendered unroadworthy by rust. I think some of us are a bit surprised that someone would take an unblemished Porsche and hack bits off it...
Just curious!
No worries 😁
There were a few stone chips/slight rust, but for a 2005 car it was in pretty good condition!
The problem I found was sourcing a ‘problem’ car with the right spec, a straight chassis and the right price.
I have to admit it feels a bit sacrilegious to do this to an otherwise good condition car, but I really wanted a decent car to build on and it seemed the only way to go to be honest 👍🏻
-
3
-
1
-
-
Project 387
in 987
2 hours ago, Daboy3000 said:This is currently my favourite thread! Keep up the good work.
Thank you! 👍🏻 I’m really enjoying doing it so far - looking at the weather however I am wondering if I should have held fire for a few months… 🤦♂️
-
Project 387
in 987
And on to the cutting...
The front intakes needed trimming back - it was roughly done and will be neatened up with the dremmel

That thing on the left hand intake is an ipad wrapped in clingfilm! It's great for checking things online as I go
Next up cutting the doors open!

It was bit fiddly getting the handle off from the door side, so ended up cutting the plastic 'pull' that won't be used. I dry fitted the new door skin but couldn't get a photo as it needed two hands! They are the first parts on (you then line up the clams to these) so once the new solenoid and handle are in I'll temporarily silicone them on and get a snap - even holding it on it looks 😎
Starting to work on the rear wing

You can see the rough black marker line where it needs to be cut to, but as there are some pipes/wiring underneath I was taking it slow
That's all for last night - I tried to get the front dampers off, but needed a very thin 19mm spanner - luckily my father-in-law has one so will give it a go tonight.
I also had a quick go at taking the windscreen out with a wire kit, but with the amount of trim inside that could be damaged I've admitted defeat and will call in a pro!
-
1
-
-
Project 387
in 987
12 hours ago, Wish said:Get rid of the sensors …… it’s not your wife’s shopping car is it ?
Get a grip man, are you or are you not a driving god ?🤣
The jury is still out for them - if I was going for bumpers on the new clam it'd be easier to blend them in, but as I'm keeping cleaner I may just not worry about putting them back.
Plus, I am of course a driving god 🤣
-
Project 387
in 987
1 hour ago, Codfanglers said:The 987 is indeed a joy to work on compared to TVRs. I owned a 350i for 5 years and anything on that car of TVR design was over-complicated and trouble.
Definitely - the Chimaera wasn't great, and I was afraid to touch anything electrical on the Cerbera!
1 hour ago, Codfanglers said:I would vote for keeping the rear parking sensors. Hardly noticeable and no less period then the rear spoiler popping up.
A very good point!
As long as I can soak the paint off so they match well they should look fine 👍
-
On 6/4/2022 at 6:29 AM, McDonald said:
Considering that cheap digital watches have kept good time, it seems odd that the clock in my car loses minutes every month. A trivial issue but curious.
Mine is exactly the same - I wondered what the problem could be, considering it's plugged into a trickle charger all of the time I had assumed it wouldn't be the battery.
On 6/4/2022 at 9:21 AM, T911UK said:Im afraid niether will be the problem, they all do it, its tied in with the PCM and there is nothing that can be done.
I guess if this is the case, I'll put it down to a feature 🤣
-
Project 387
in 987
Managed to get a couple of hours in over the weekend - juggling with family/work was always going to be a challenge!
It's starting to look more naked!
Front wings off

Working on the suspension - I found a local company that will swap the springs over if I take the dampers in for £15 a side, it's cheaper than buying a spring compressor, and to be honest that was one job I didn't fancy having seen what can go wrong on youtube
Wing mirrors off too now. You can see the marker on the door - this is where it needs to be cut open as mentioned in a previous post.

I've worked round to the back now. Bumpers, tonneau, lights etc off. And yes, that's a huge pile of bits in the box behind!

Various wiring - proximity sensors, number plate lights

I'd like to be able to re-use the sensors, so will try and soak in thinners to get the original paint off. The only issue is where to place on the new body, as they're not exactly period! It might end up that I go without, but I'll play that one by ear.
One thing I've noticed throughout the disassembly so far is how well engineered these cars are - everything is well thought out and logical, with wire connectors where you need them, recesses for the spanner to unbolt etc, which is quite refreshing from working on TVRs!
Hoping to get another couple of hours tonight/tomorrow so should be on the cutting
Wait until you guys see what I have to do to the rear wings!
Once everything is cut, I'll give it all a good vacuum and wipe down then I can start putting it back together
-
2
-
-
Project 387
in 987
It's been like Christmas with the deliveries coming (and costing a small fortune!)

Rear grills, different number plate options, door mirrors, front indicator grills, lights, light grills, rear light clusters, front bonnet handle and crest... the list goes on and on 😁
New springs get delivered today (the front needs to be lowered by 30-35mm), but unfortunately you can't buy just fronts so if anyone needs rear springs let me know! Side note; I found out if you have PASM the springs need to be linear, not progressive
-
Project 387
in 987
17 minutes ago, Del_tl1000r said:Looks like your passing the point of no return now! Why do the door skins need cut?
Certainly feels that way!
In order to raise the top line of the doors and blend in with the new clams, there is a new shell that goes over the original door - for access to the handle mechanism and alignment most of the door gets cut open 😲
Soon I'll have to cut the rear wings!
-
Project 387
in 987
And so it begins...
Jacked the car up and moved it through 90 deg on the dollies - I had envisaged this being a doddle, but it despite the floor being really smooth it was bloody hard work to shift it round!

Then off with taking it to bits

I'm struggling to get the front wings off so may end up cutting the brackets I can't reach the bolts for - the original plan was to sell all of the parts, but the wings don't seem to be getting for much.
Once the front is bare, I'll work my way round to the back and tonneau cover. Then it's onto the cutting of the door skins... 😲
So far it's been the odd hour here and there in the evening, but hoping to get a better run at it over the weekend.
And yes, it's been mentioned more than once that 'why am I doing it now, when the weather is getting good'
- I'm just impatient like a kid with a new toy 😁
-
3
-


Should this shock have a big hole in it?
in 987
Posted
Do you mean this one?
If so as mine is in bits at the moment I had a quick look at the rear and they've definitely got the hole in too (PASM Boxster 2005). In fact there are a couple, so I'm not sure if they're there to help removal/compression?