


timbobalobox
-
Posts
193 -
Joined
-
Last visited
-
Days Won
1
Content Type
Profiles
Forums
Events
Store
Posts posted by timbobalobox
-
-
Project 387
in 987
20 hours ago, skoosh1970 said:... i have a sneaky suspicion that Timbo's is gonna look a let better than this as i suspect she'll be a darker colour. Rear wheels need spacers and it's just sitting too low for me hence it looks too long...?
Just my opinion of course but £60k.... it'll be for sale for a while at that price.
However, i really like the rims.
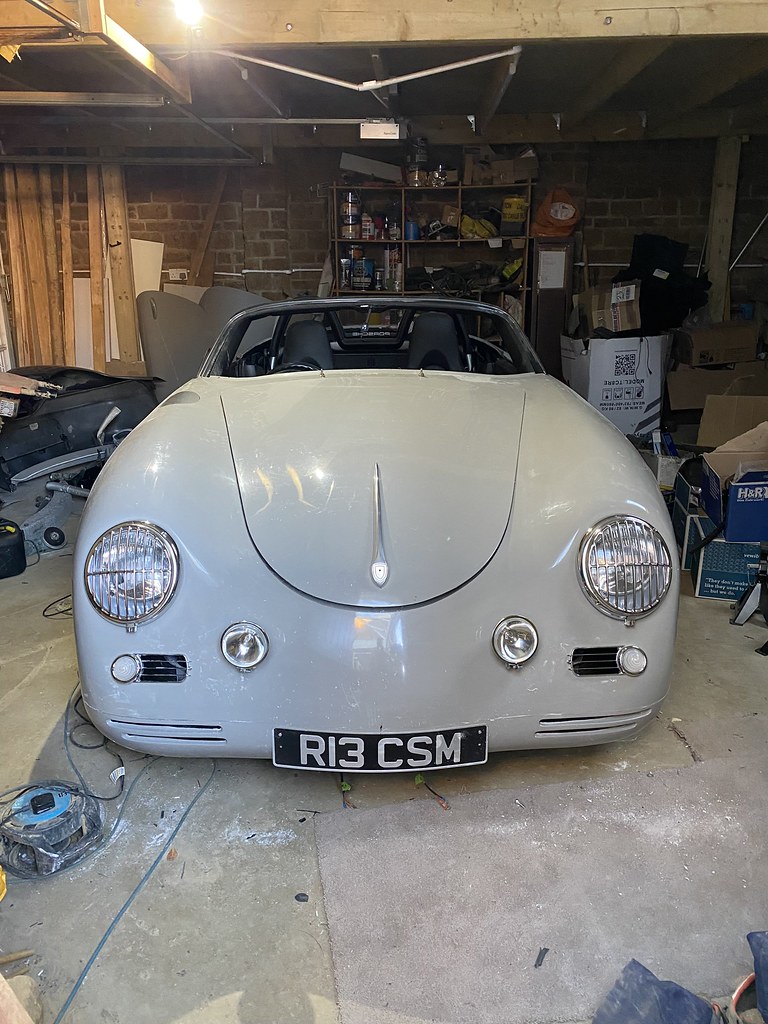
Thank you! I'm going more for the 'Outlaw' look (company in the States who rebuild original 356s). These cars seems so colour sensitive - I'm still thinking the original 'slate grey', but maybe with a touch more green in like Walter Roehrl's, that can all change once I see the mock up!

I think those rims are quite similar to the ones I'm getting - can't remember if I've got the black centres powdercoated as it was a while ago I ordered them

-
 1
1
-
-
Project 387
in 987
On 1/10/2023 at 2:30 PM, Menoporsche said:That ad has been on here before, I remember the rather bizarre price. Shows it hasn't sold yet.
I think you added me to one for sale on another topic - this might have been the one I test drove. Looks lovely in the flesh
-
Project 387
in 987
On 1/10/2023 at 10:00 AM, ½cwt said:How's things @timbobalobox, some withdrawal kicking in here! Not wishing to pressurise though.
Sorry guys - it's still in the paint shop! There were some delays (the door, front bonnet latch going on so it could be gapped etc) which meant it lost it's work slot several times

I'm confident in the guy's work, so not rushing it. I would have liked it back pre-Christmas as mentioned as I could have worked on it in the downtime, but it wasn't meant to be!
I spoke to Iconic last week and the wheels should be ready in the next week or so.
However... I am due to be starting my busy period at work so I'll fit in what I can. I also just realised it's almost a year since I got the car! (2nd Feb)
-
 1
1
-
-
Project 387
in 987
On 11/28/2022 at 4:06 PM, Daboy3000 said:According to my timbob387 calendar, it should be coming home soon and I am not talking about the footy.
Any news @timbobalobox ?
Sorry for the lack of updates!
I spoke with the painters yesterday and they're still finishing everything off - it's taken much longer than expected to get it to a standard they're happy with prior to painting. Whilst it's a bit disappointing to have not had it back by now, I'd much rather the quality is right
")
At least the weather is rubbish at the minute (unlike summer when I had only myself to blame for missing out
)
I've just got off the phone to Iconic about the wheels too, they should be another couple of weeks as they're just being machined now.
Fingers crossed this side of Christmas I'll have it back, so over the holiday I can have a go to get it all completed 👍
In the New Year I might even try some track days in it 😎
-
2
-
-
Project 387
in 987
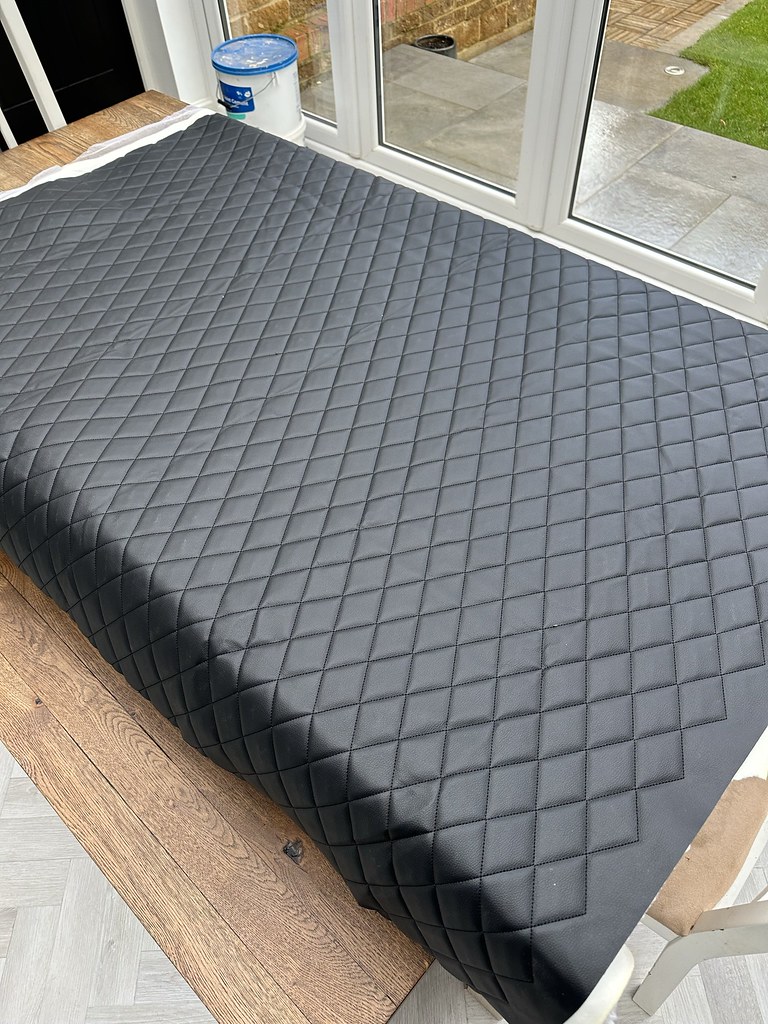
On 10/31/2022 at 1:58 PM, timbobalobox said:Not a huge update this week - received the above vinyl, but to be honest in the flesh it's not as I had hoped. I've ordered some other with a better pattern and foam backed which should be a bit more tactical.
Received the vinyl and a lot more happy with it, so will give this a go on the tonneau cover. Still reserving judgement until I see it on the painted car/against the existing interior, but for now I quite like it. It's foam backed so feels much nicer than the other stuff I've had so far.
Just a sample (which should be enough to go over the tonneau) - I'm going to order some more shortly to line the underside of the frunk lid and battery/washer bottle cover. Might also see how it looks for covering the trim behind the seats. We'll see as I don't want to over do it!
Spent a bit of time this week getting some of the light brackets sorted and took apart the main lights to put the grills on.
-
Project 387
in 987
23 hours ago, Wish said:My only complaint is this has gone too quick, needed to strung out for a good few years. 😃
You’ve made it look far to easy 🤩
Thank you!
I'm just back from the painters as we needed to fit the front latch (which turned out to be a pain in the ass), but it needed doing so the gaps can be done properly.
A few fiddly bits left to do, that's for sure!
-
1
-
-
Project 387
in 987
23 hours ago, map said:If your replacement vinyl doesn't suit a number of the early 911 guys use something like this:
It may not be what you’re looking for but I thought it might be useful.
That's great, thank you. It's quite a good price too 👍
-
Project 387
in 987
55 minutes ago, Daboy3000 said:It's going well. Would love to see this car in the flesh when it's all finished. I take it you will be taking it to some shows?
Thank you.
That's the plan - I might venture on some of the local Porsche meets, not sure how it'll be received though
I missed out on doing some track days too, I think it could be quite entertaining!
-
Project 387
in 987
Not a huge update this week - received the above vinyl, but to be honest in the flesh it's not as I had hoped. I've ordered some other with a better pattern and foam backed which should be a bit more tactical.
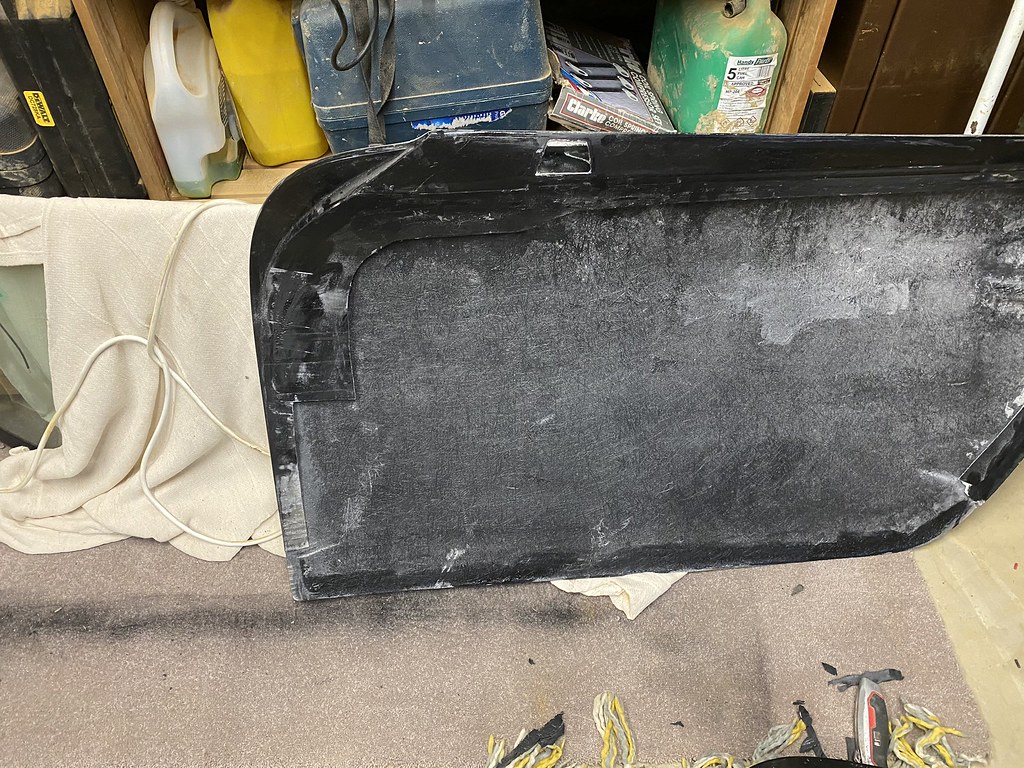
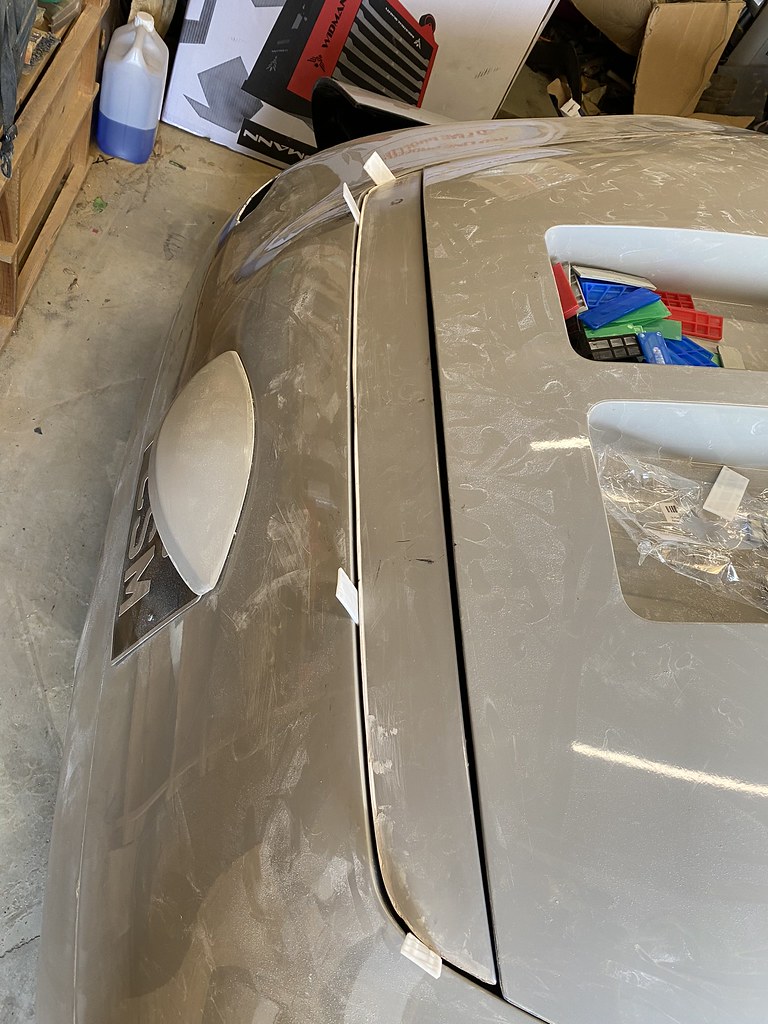
Went to the painters the other week (forgetting to take any photos!) and re-hung the door with them. Nipped in today to see how they're getting on;
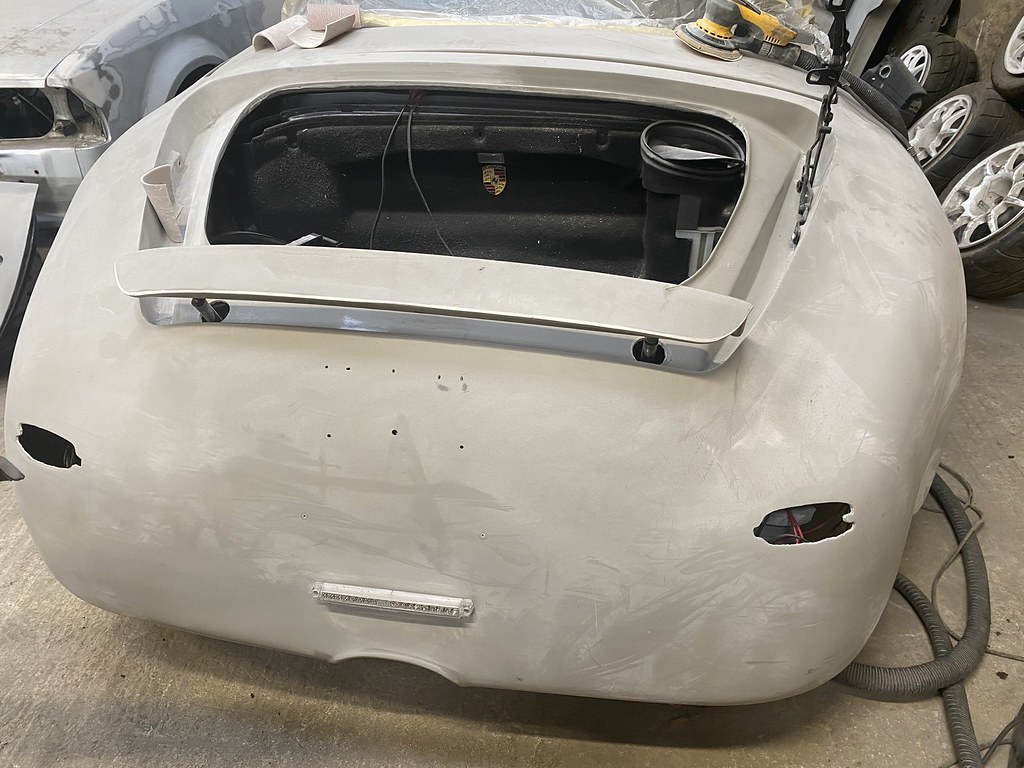
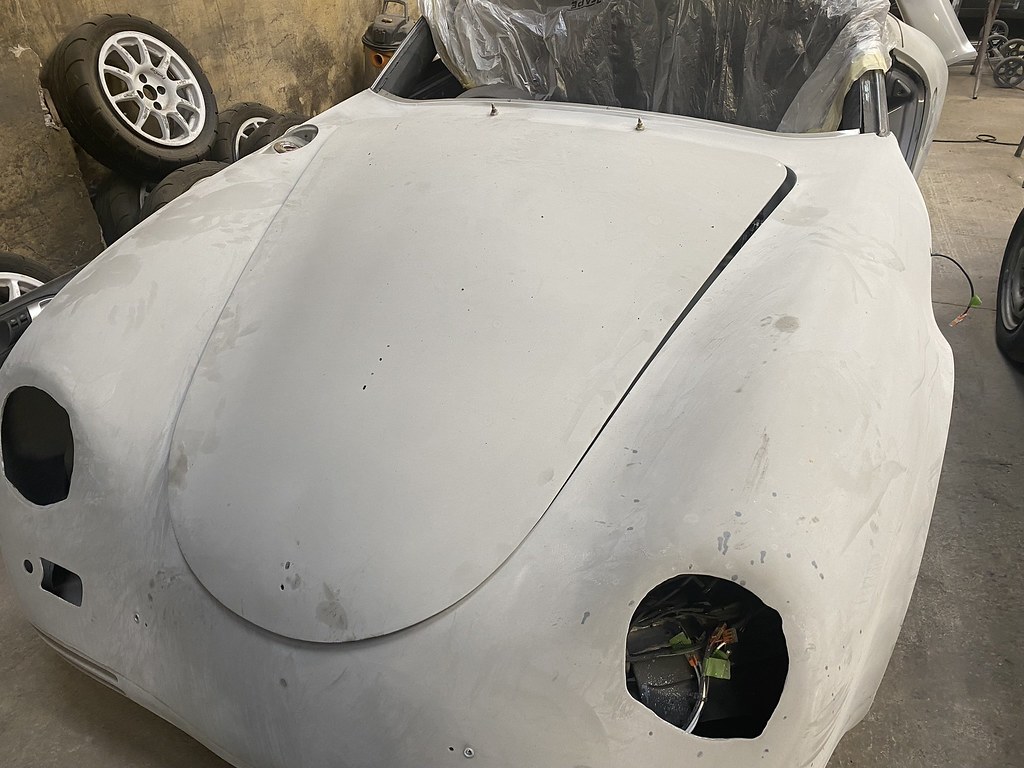
The green line is filler where we wanted to tidy the door profile a bit, and you can see the 3d printed vents in the boot - these fit like a dream.
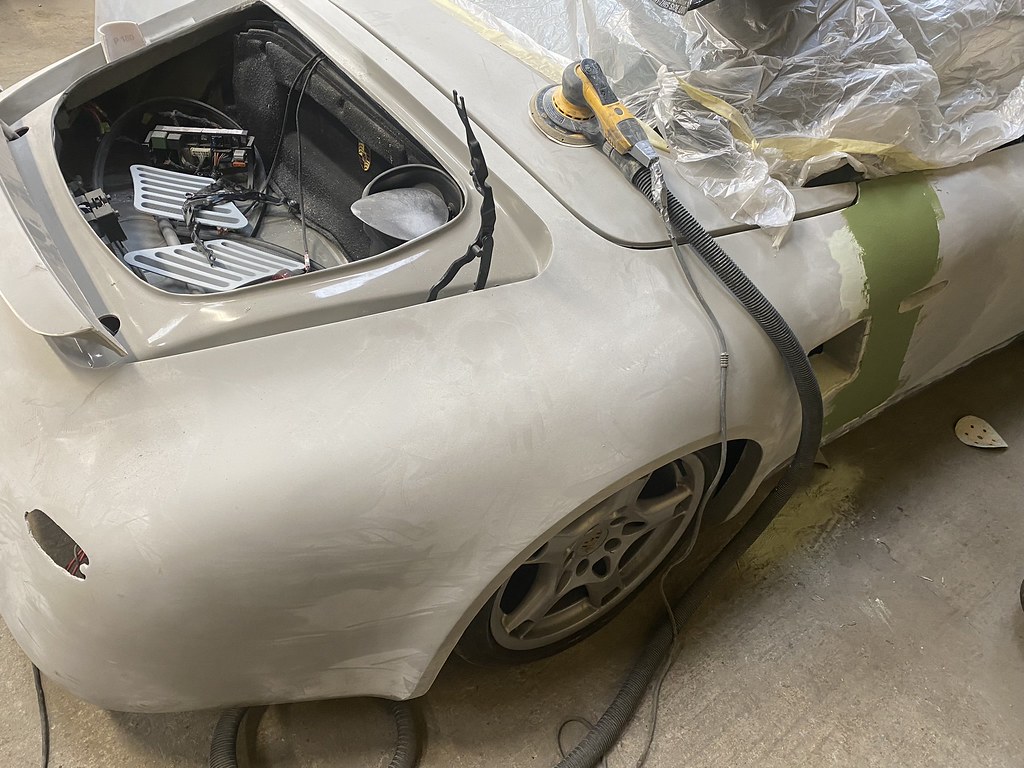
They've asked me to go by Friday morning to check on all of the gaps to make sure I'm happy, then it will be fully primed afterwards. After curing for a week... time for the colour to go on
I reckon another 2-3 weeks and it should be coming home 👍
-
2
-
-
Project 387
in 987
42 minutes ago, Terryg said:Yep good job, looking forward to the finishing stages, probably not a much as you though.
Definitely - really looking forward to getting it back home and doing the finishing touches.
I've just ordered some different leather (vinyl really) for the tonneau cover and the underside of the front bonnet (and potentially some of the centre console) in this pattern. Hoping it will make a subtle period-eske feature, but I'm reserving judgement until it arrives!

-
1
-
-
Project 387
in 987
On 10/10/2022 at 9:24 PM, Terryg said:Thanks for the update, hope it goes well with the door.
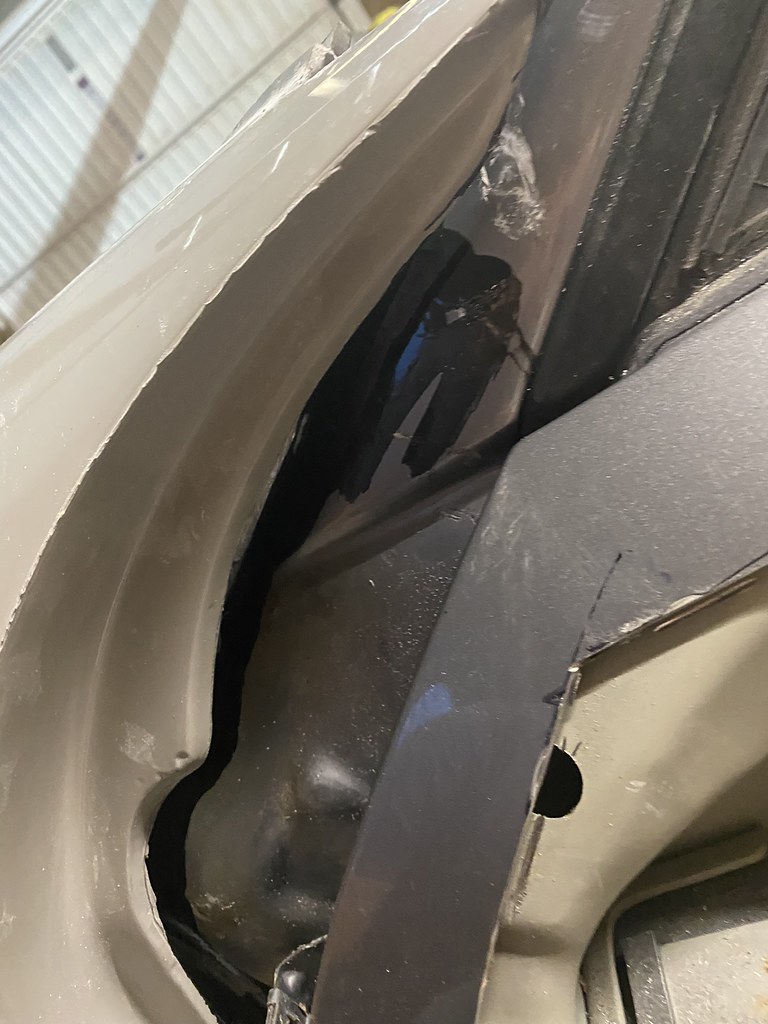
To be honest it wasn't a job I was looking forward to - I had tried to use the windscreen remover wire I bought (and subsequently didn't end up using) but it kept getting gummed up with the adhesive or just snagging on the cut edge of the door. I didn't want to force it for fear of breaking something, so went with the reciprocating sabre saw with a wood blade in so it was nice and coarse teeth to avoid getting clogged.
Success!
Some slight scuffing which I can live with - more importantly I didn't cut through the door face! I kept it nice and tight against the metal and took my time.
You can just see the new windscreen under the dust sheet to the left of the image, with it's heated element wire hanging down.
After stripping off the remaining adhesive I primed both of the surfaces again to make sure it would make a good bond

Hoping to get to the painters on Thursday to re-mount the door and skin - I'll get some pictures whilst there. He's keen to get it all primed which needs to be left a good week or so to really harden, so with any luck we'll be a week after that. Middle of November is my aim!
-
1
-
-
Project 387
in 987
10 hours ago, Quinten said:If it's any consolation, my Westfield has no reflectors and the MOT tester doesn't care. But if I were to fit some, then I'd go for these type https://www.ebay.co.uk/itm/225090939255
I also wondered if they'd be bothered to be honest - those look a nice solution too 👍
-
Project 387
in 987
10 hours ago, Araf said:Did you resolve the reflectors?
On bikes, if there isn't one, we can stick them on the corners of the numberplate. Not sure what size you need, but it's an option, just for the MOT. When you get home, you can put the black/silver plate back on and forget the reflectors.Not quite yet - I was half thinking not to put them on and use the first MOT as a check to see what I needed. If so that's not a bad idea with the plate!
-
1
-
-
Project 387
in 987
Sorry for the lack of updates folks - it's been manic with work over the past couple of months!
It's still at the painters! I haven't rushed it too much as I knew I'd be busy with work and didn't need the distraction
Last week I collected the new side vents from the 3D printers - these look great in the flesh and fit like a dream (I'll get some photos next time I nip into the painters)
The body shell is all sanded and filled - we weren't massively happy with one of the door gaps, so the whole door is off and back with me to remove the new skin so it can be remounted/gapped better. Truth be told I think it slipped ever-so-slightly as it was curing, so no-one else's fault other than my own 🤬 It's one of those things that in the real world it would possibly be fine, but it's all I'd ever see if it's not changed!
I've also ordered the new wheels which are being made as they're not a stock item and these should be ready for the end of this month, along with the car back from the painters (mid November at the latest)
Once it's home, it's putting it all back together;
- windscreen in
- fit arch liners
- fit wheels/tyres
- all of the lights/electrics back on
- fit windscreen wipers
- cover tonneau in leather/vinyl
- mount speedster humps
- mount mirrors
- MONSTER deep clean as it's dusty as hell!
I'll get some more pictures done this week 👍
Have a good evening all
-
1
-
2
-
-
Project 387
in 987
23 minutes ago, ½cwt said:Of course you did, as I suggested it went on a frame with the plate...
 24 minutes ago, ½cwt said:
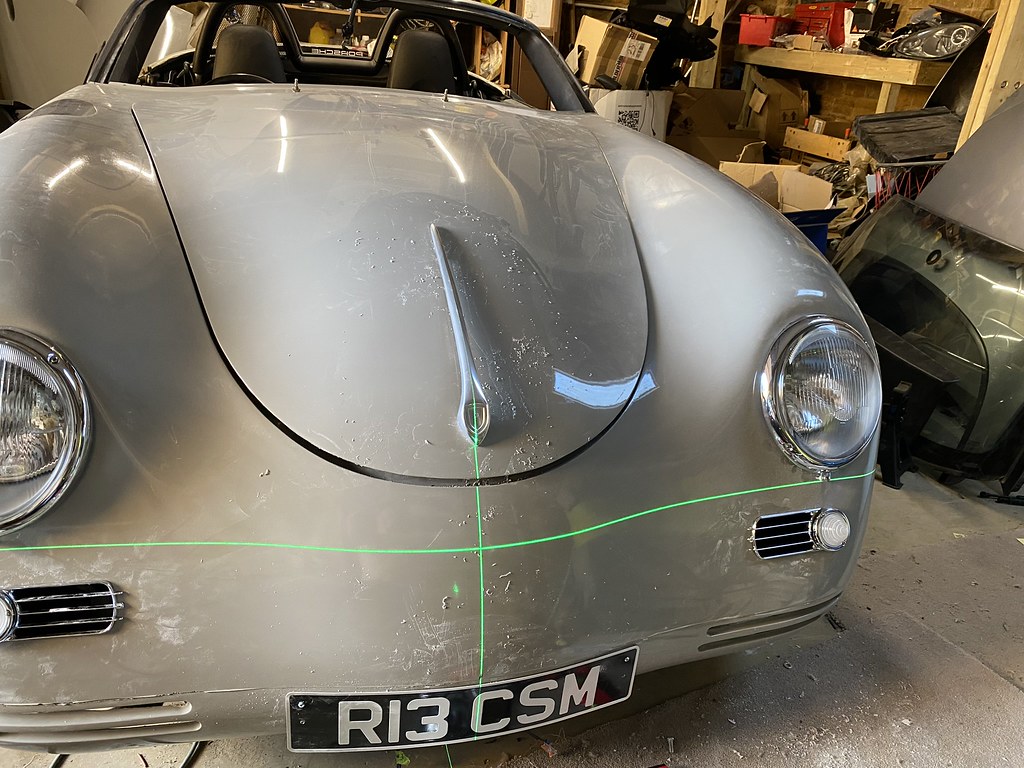
I think where the holes are on this one would look great - looking on www.legislation.gov.uk there are no requirements on size, so I could get away with something similar to this 👍
Exhaust is pretty meaty too 😎
-
Project 387
in 987
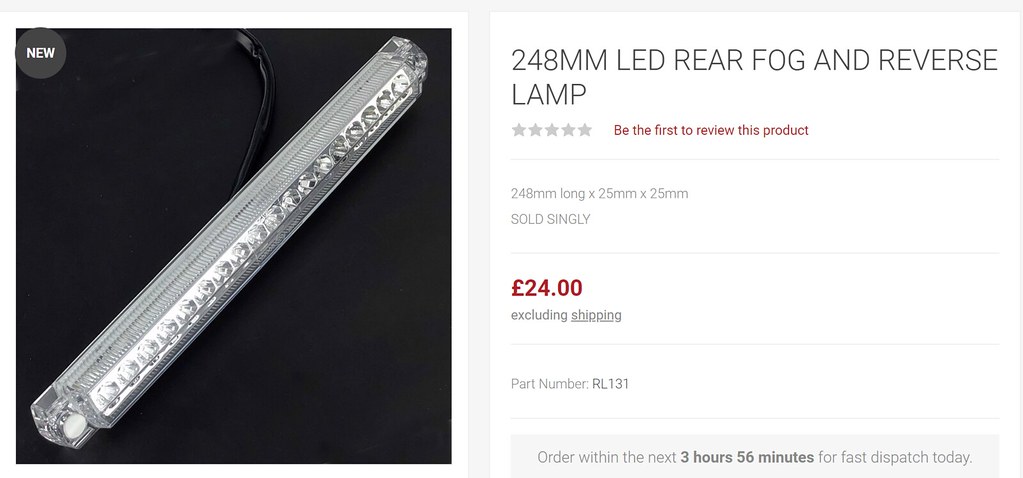
13 minutes ago, ½cwt said:If you are putting reverse and fog in pos 2 with a circular reflector the same diameter as the lights beside to the inside to make symmetrical?
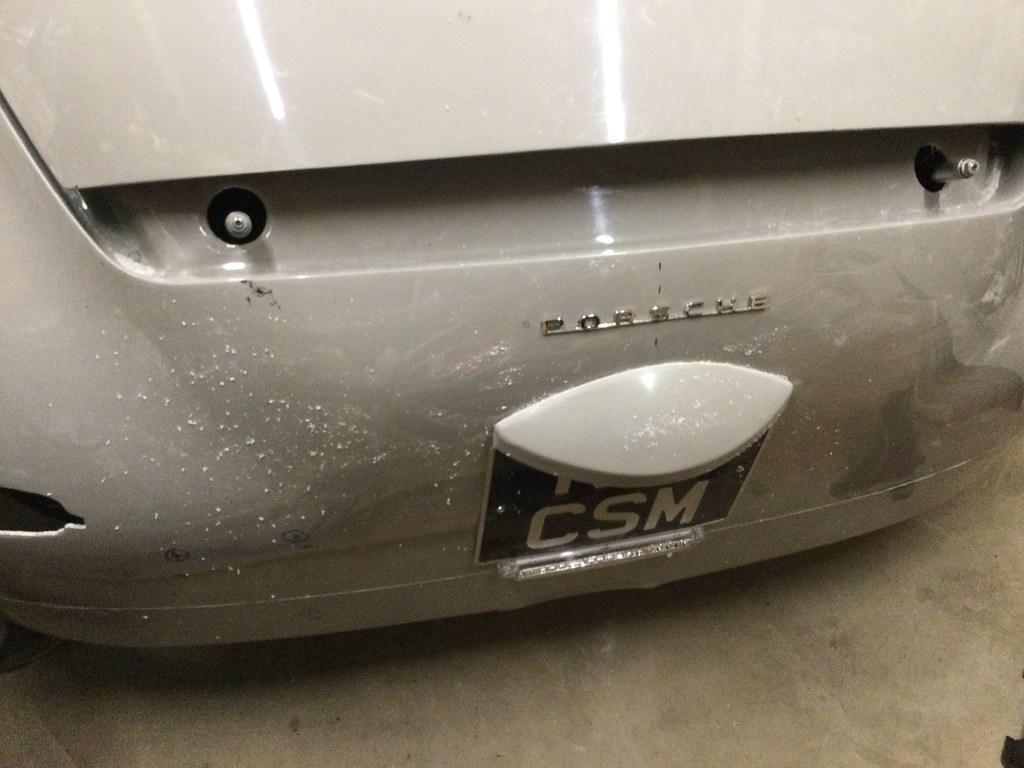
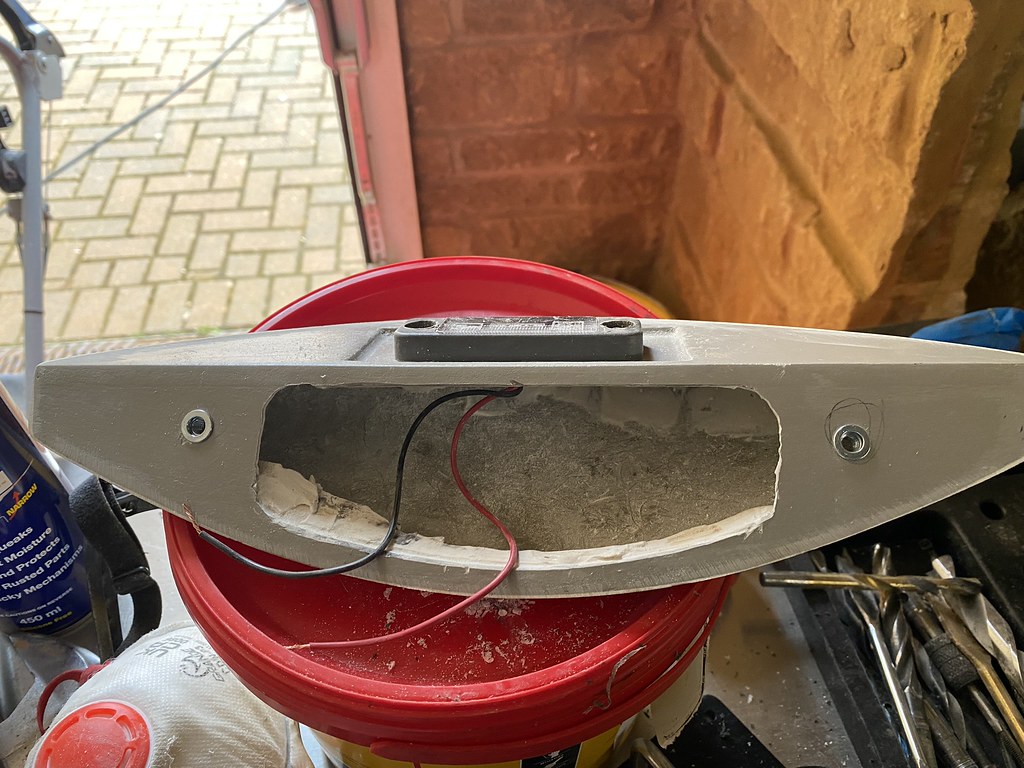
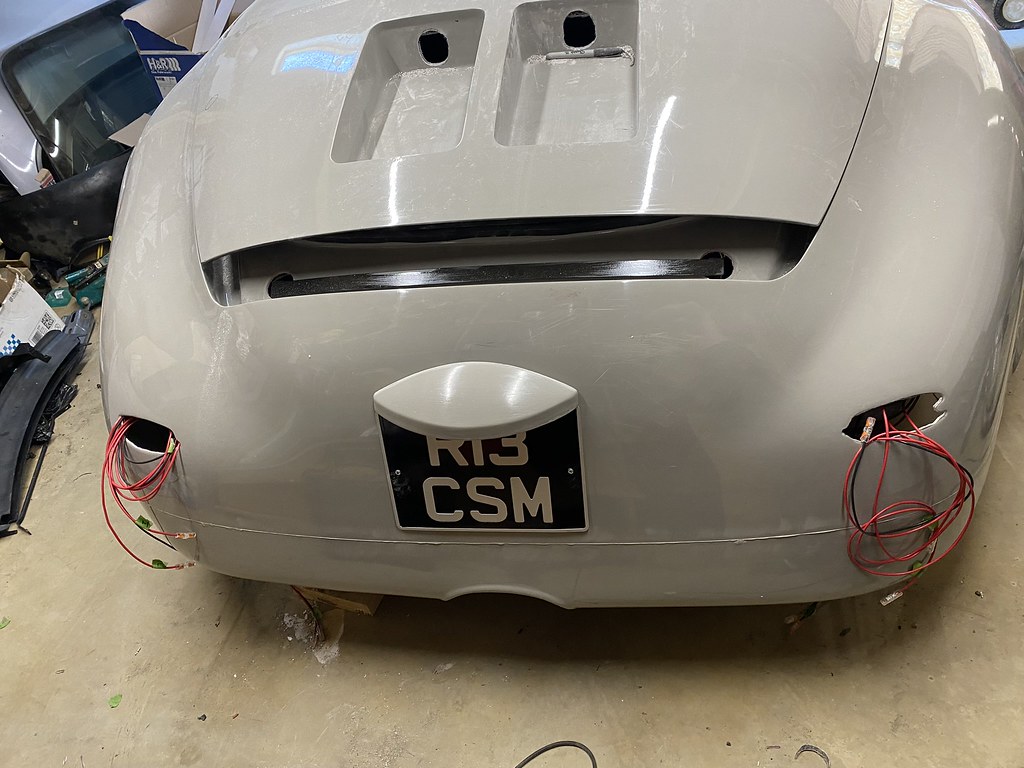
In the end I went for the dual reverse/fog light under the number plate - hopefully once the edges of it are painted the same colour as the body it should blend in quite well.
I ordered some small chrome-edged reflectors but they look quite cheap in the flesh unfortunately, so I'm on the hunt for something nicer! I think circle would probably look the best
-
Project 387
in 987
This week's update
Rear badge mounted. I'd taken the spoiler off to finish bonding it onto the bracket, and you can also see the reverse/fog light underneath - I'll get it painted around the edge to help it blend it too
Bonded the covers for where the mirror mounts used to be and primed the doors ready for the skins (black looking paint)

Loads of adhesive!

And then...
...
...
...

Just got picked up today ready for paint (masking tape to keep the frunk lid down
) Roof up too (not sure why, if it
rains there is no windscreen, so what's the point
)


I've still got some bits I can be working on with the car not here - getting the lights ready, covering the tonneau/battery cover in vinyl etc - but it's going to feel strange not having it in the garage!
The sprayers have got a fair bit of prepping to do with the sanding/filling/gapping before priming it, but I've not really given a timeframe as I'd like it done right - the paint is what will make the difference to the finished product. I've just ordered the wheels (40 day leadtime) and need to collect the side vents/fuel pipe/rear undertrays.
I've had an insurance quote which needs a tracker (not black box thankfully) to be a reasonable price, so need to get on that too. Once it's back I'll get all of the lights/bonnet struts back on hopefully in time for the MOT 👍 I expect in order to pass I'll need rear reflectors, which I hadn't thought about too much until now unfortunately - back to the drawing board for the rear design!
I'll keep the thread updated when I get anything meaningful done, but until it comes back enjoy the rest of the summer everyone and hope to have something interesting to post soon.
Thanks again for all of the support/comments - whilst it's far from finished, it's been a great project so far and it's been really encouraging to know there's been an interest.
-
4
-
-
Project 387
in 987
Thanks everyone 👍
-
Project 387
in 987
It's that time again...
It's been a week of finishing jobs off I've been putting off!
The main thing has been sorting the bloody door handles out 🤬 I asked a neighbour for a logic check and he kindly offered some advice for poking around to find the best feed.
I've had the door cards off trying to find a source with a mulitmeter that is only live when the car is unlocked - thought I found one but it turned out it was for the CANBUS so couldn't be used.
Then finally realised on Friday that the power doesn't actually need to be off to the actuator when the doors are locked, as the original lock mechanism is deactivated anyway <facepalm>. Dug around for a bit more then found one feed at 10.9V (off the lock as it goes) which I thought would be enough, only to find it's not! Back to the drawing board. Eventually found one buried in the loom at 11.7V to the window circuit that drives the motor. Rigged up a test circuit and success! Spent a huge chunk of time on Saturday working out that...
On to wiring it in;
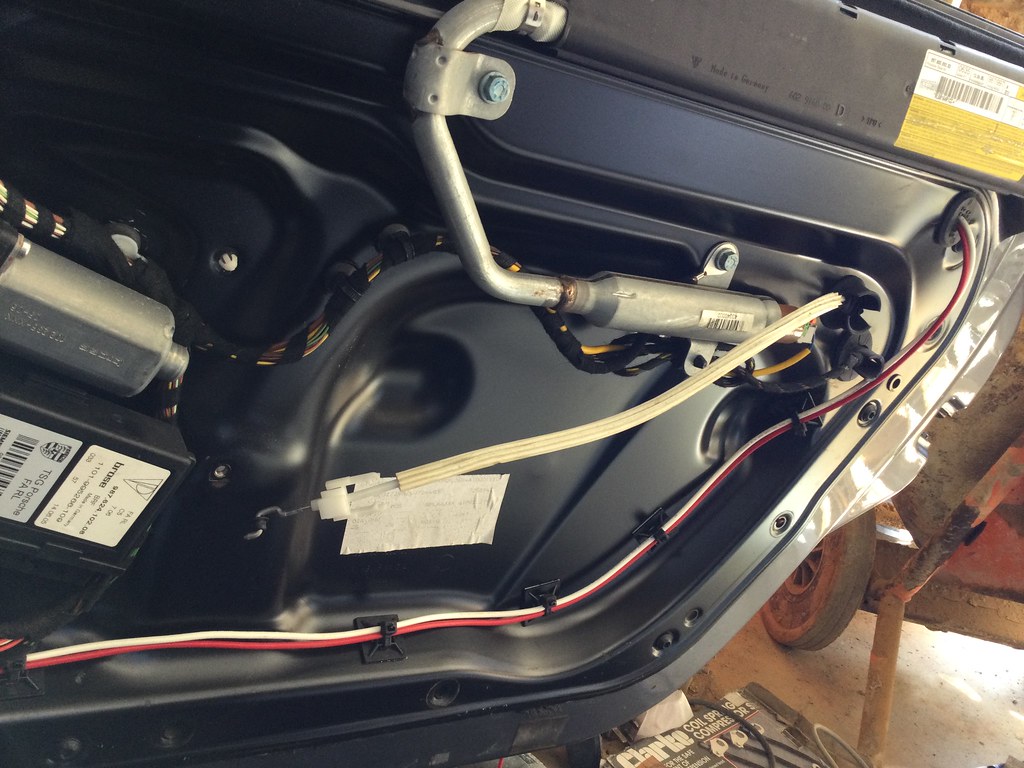
Then the other side
It was a quite a moment getting it all working as it's been a head scratcher for some time! Everything worked (except for the windows, which turned out just to be a loose connection after much swearing). Did the passenger side much quicker this evening! Cannot tell you how satisfying it was to sort.
I needed to use up the bonding silicone I used for the button, so mounted the spoiler. It looks a touch low in this shot, but the adjustment on top of the rams is quite easy. And yes, I used window packers
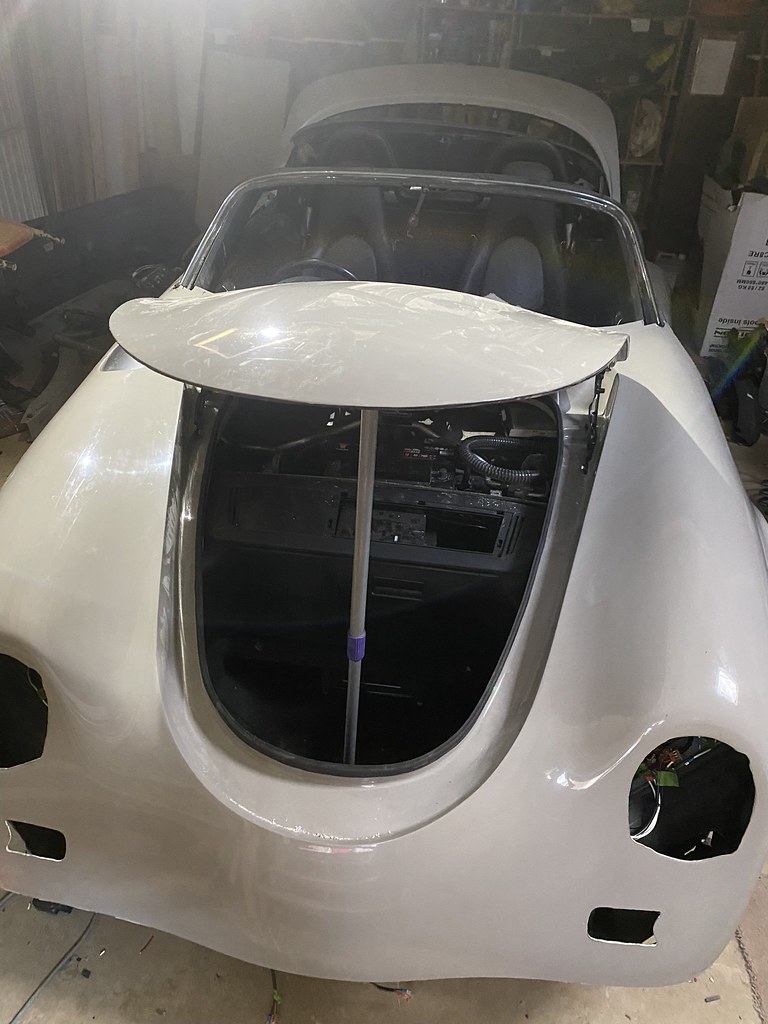
On Saturday I also tried the new windscreen in as I had visions of it not fitting after painting... Luckily it dropped in like a dream! I completely forgot to get a picture however.
Lastly, I got the painter to nip over and check what level of finish they needed - once the door skins are on they're pretty much happy to take it away
 The end is truly in sight now!
Things to prior to painting;
-cut the other handle hole on the passenger door
-bond door skins on
-mount speedster humps
-order a replacement front number plate
-mount the rear fog/reverse light strip (it turns out it needs a bit of a recess/cut out for the back, so will have to mount permanently below the number plate - thanks ½cwt for the idea however of mounting it to the yellow plate)
Have a good week all 👍
-
2
-
-
Project 387
in 987
25 minutes ago, Daboy3000 said:That could work better, any photos with one on?
I can't find any at the moment, but I've ordered one anyway to have a go! I'll stick some images up with it tacked on 👍
-
1
-
-
Project 387
in 987
20 hours ago, Daboy3000 said:Can you not hide them somewhere, like in the number plate?
or maybe one central one above the exhaust.
I have just been looking through google images and some of them look a bit cluttered with up to 3 units each side.
The more I look at it, the more I am inclined to agree that it could look a bit cluttered and less like the original. Iconic themselves usually use this mounted just below the rear number plate;
Being clear I think it blends quite well and can only really see it when it's lit
-
Project 387
in 987
3 hours ago, ½cwt said:Loving these weekly updates. This is a fantastic project.
Position 2 for the reverse/fog lights as it reflects the spot light positions on the nose? 3 reflects the side light positions but will be a sod to mount due to the double curvature of the bodywork in that location.
BTW What ae you going to do with your weekends once it is built?
Thank you 👍
Agreed with position 2 matching the nose - at the moment it's between 1 and 2!
Not sure yet, I'm sure I'll find something to work on 🤣 Hopefully go for some nice drives 😎
Spoke to the painter earlier and he's going to pop by later in the week to see if it's ready enough for him to collect (doors pending). Be nice to know how much more is left to do before I can hand it over
-
Project 387
in 987
It's the Sunday night update 🤣
As per usual, didn't get as much done as I'd hoped!
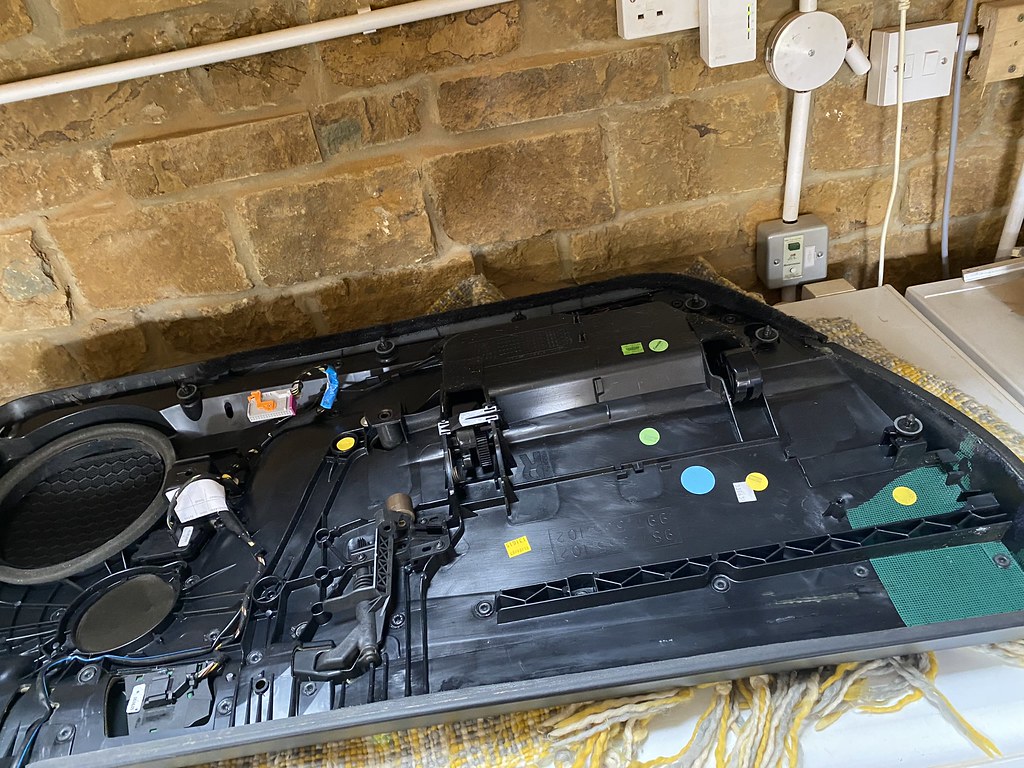
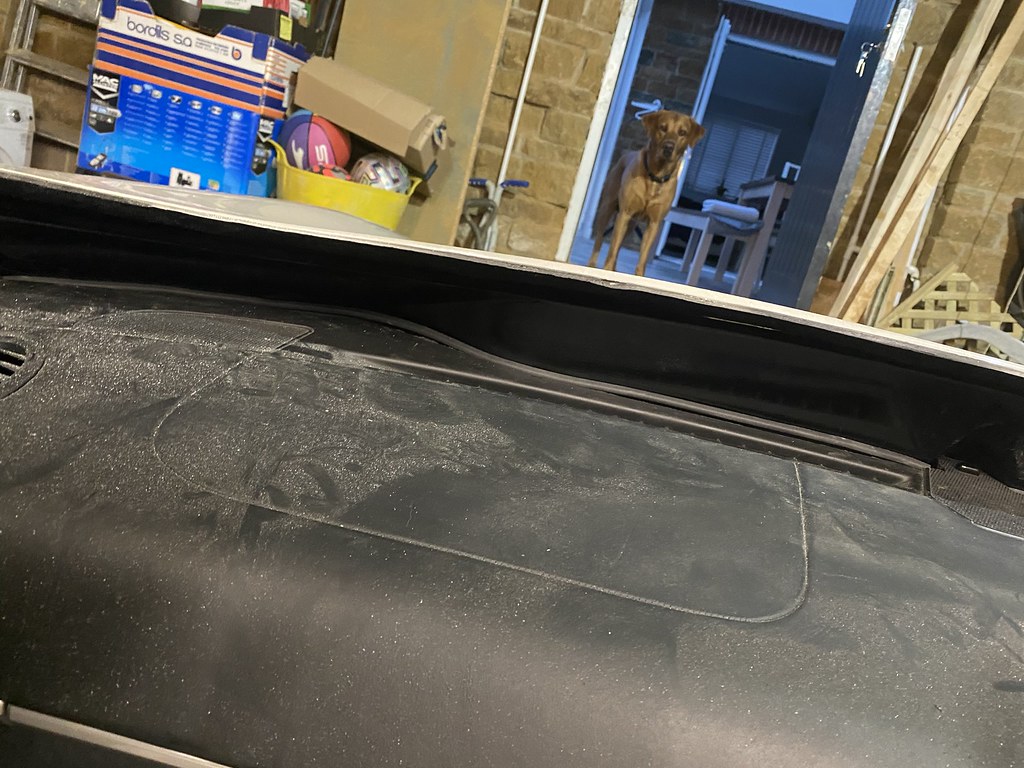
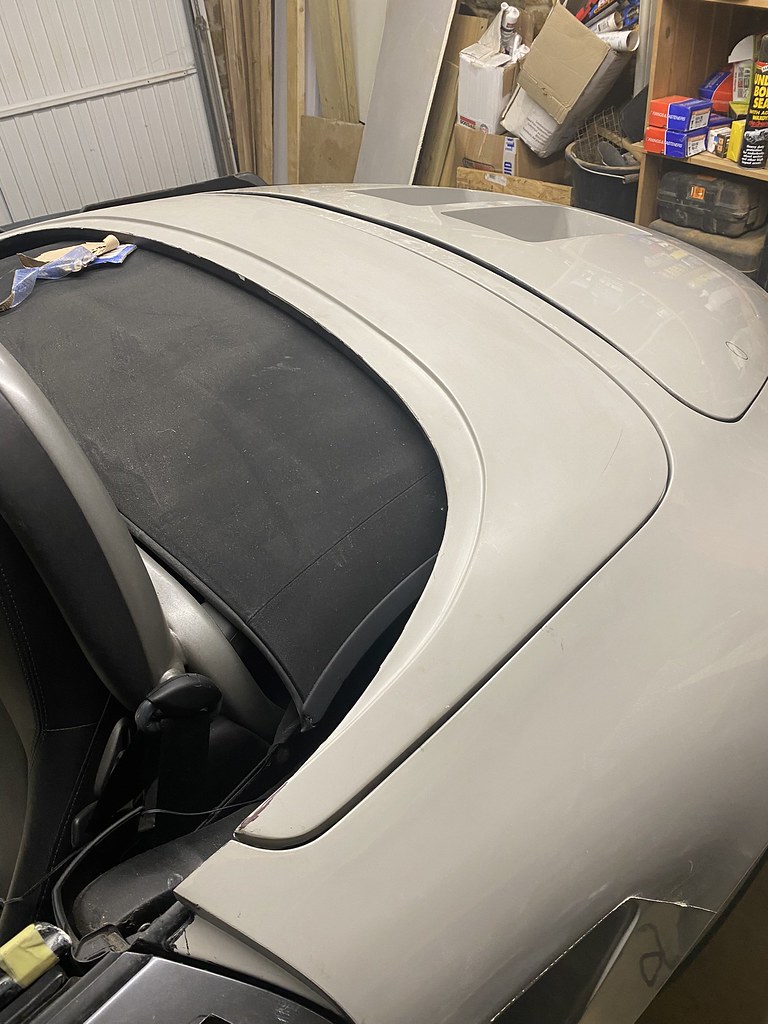
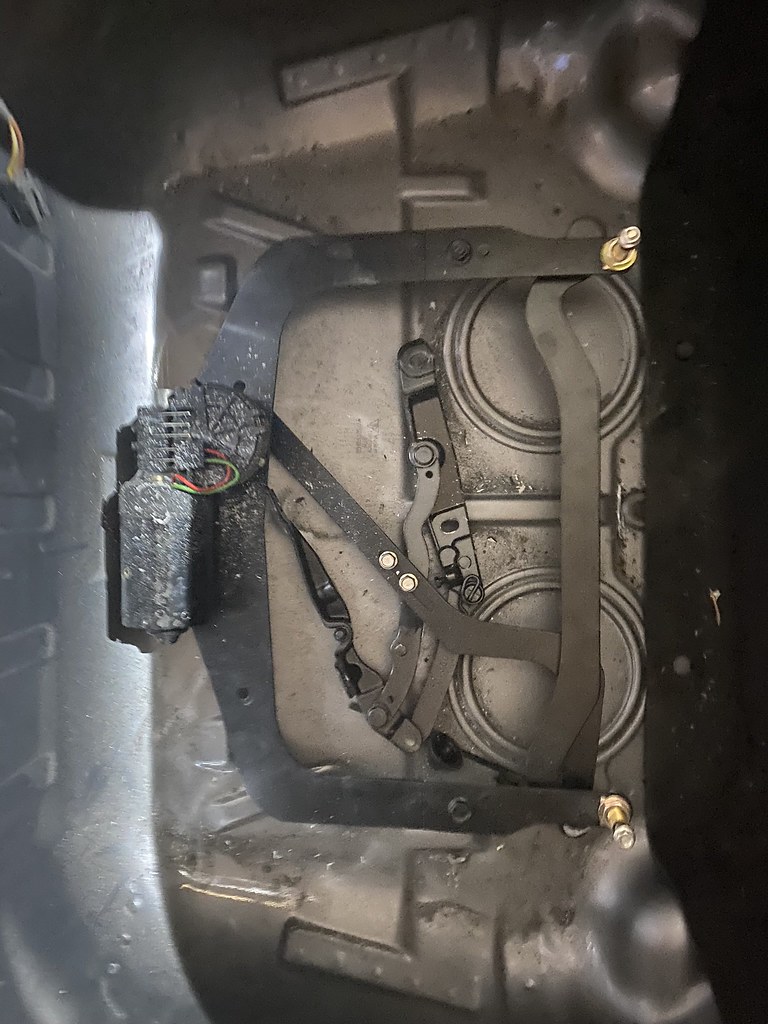
Spent a frustrating few hours on Friday installing the wiper mechanism - it was quite fiddly and took a bit of head scratching to work out. Got there in the end though! Attached the tonneau cover (need to lift the roof part way).
Also had to modify the bonnet hinge slightly; note the patented bonnet prop
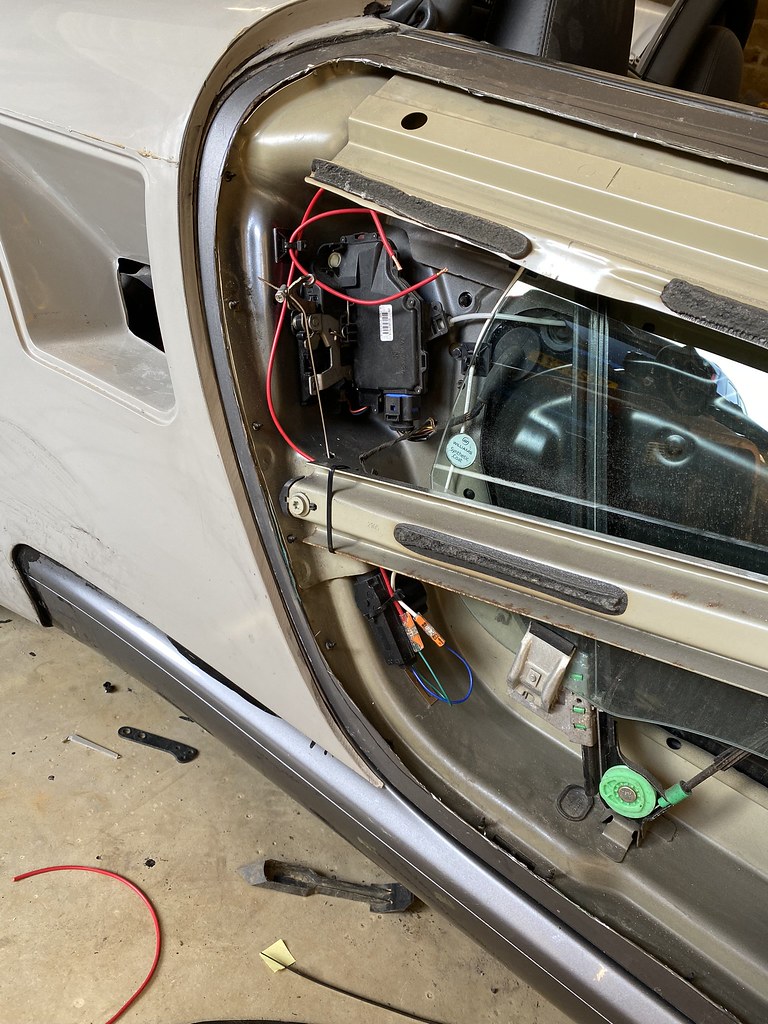
Door skin back off, ready to wire in the new handle (you can just about see the new wiper arm spindles). Tested it and it works!
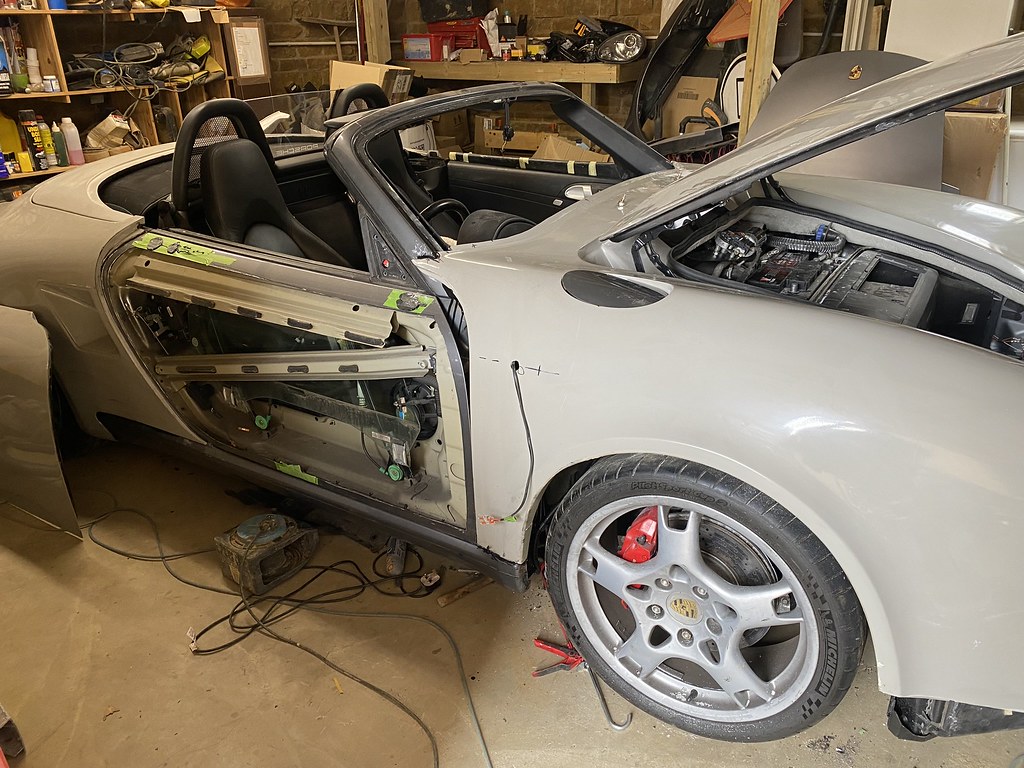
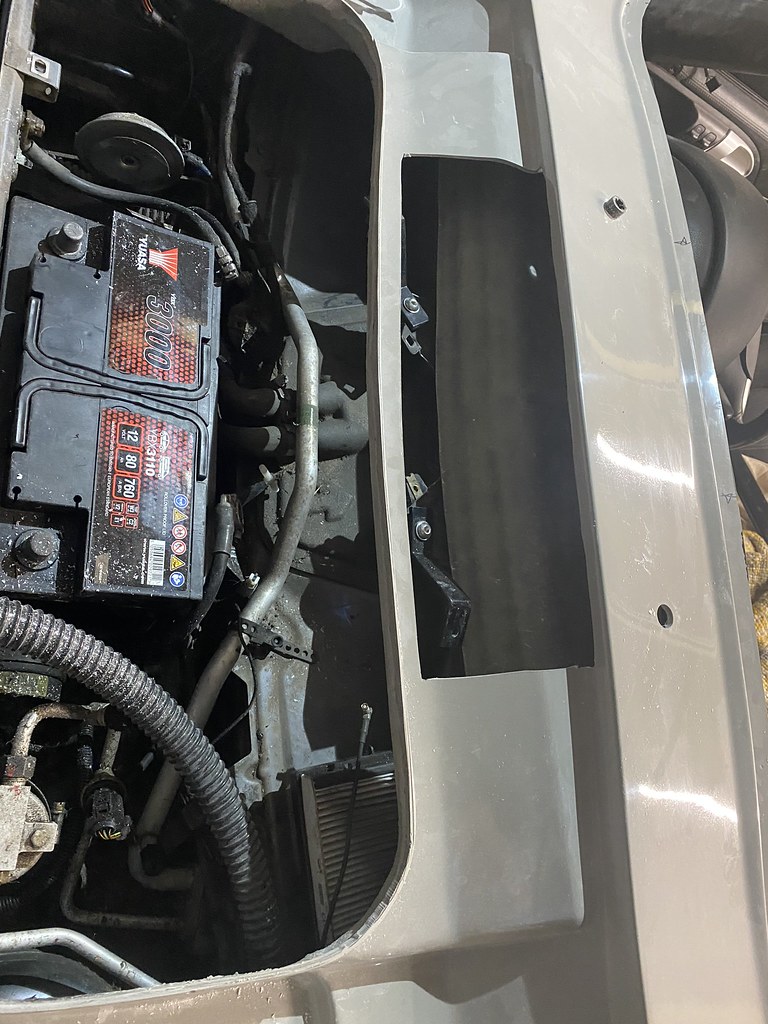
I had hoped I could work from this side to get the power feed, but annoyingly had to take the door card off. You can see the door airbag canister - I have to admit I always look at these nervously...
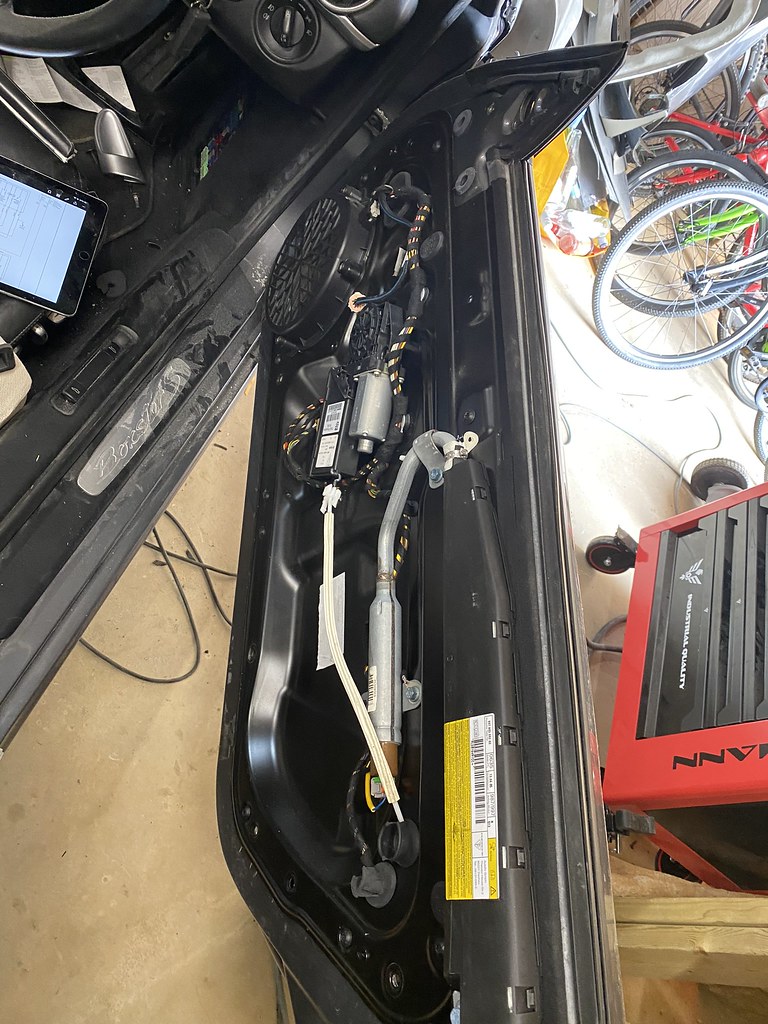
Door card on work bench (freezer)to take the feed
Temporarily put the card back on to test and... doesn't work 🤬🤬🤬
My logic was to wire a feed from the door window so it would only work when the car is unlocked, however I hadn't realised you can't operate the windows with the ignition off. So, you guessed it - now the exterior door handle only works if the ignition is on 🤣🤣 Back to the drawing board.
Kept myself busy by attaching and priming the bracket for mounting the new spoiler on, then tidied up all of the wiring I had left in the boot (along with the spoiler). The spoiler is bonded onto this bracket which is in turn bolted to the existing motors.
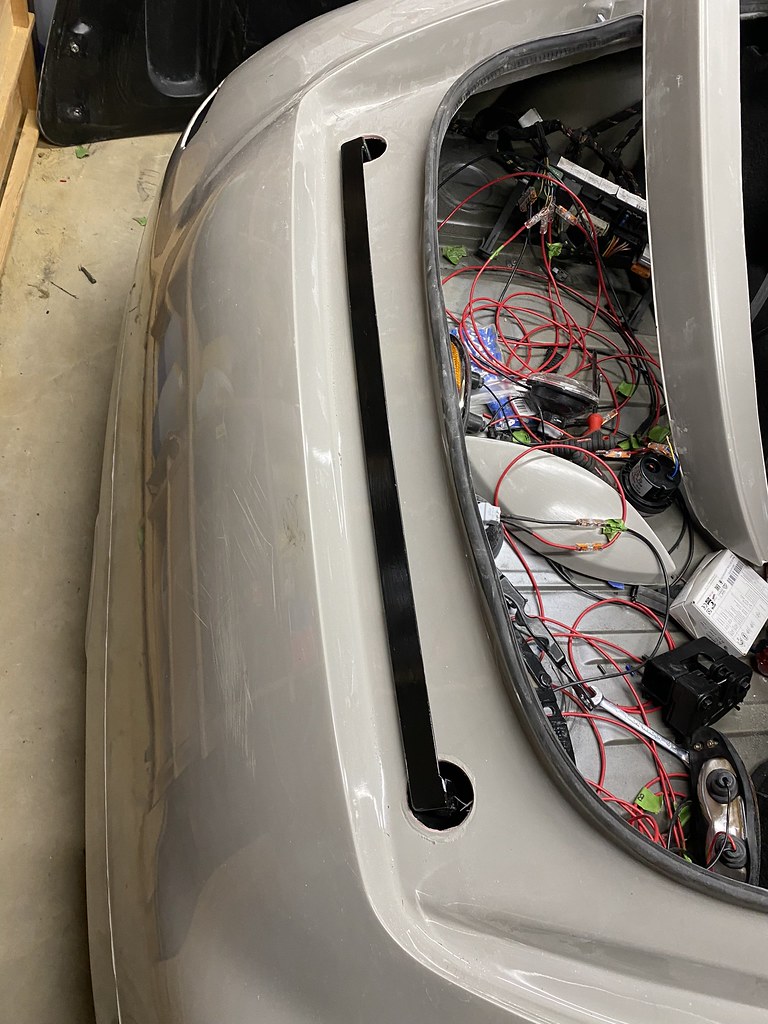
Working out where to put the number plate light... You can see the brake light holes in the vents - I've since tidied up the holes as they were bugging me! Rear boot lid is also now hinged.
Light holder hollowed out, light attached and riv-nuts in. They don't look level in this picture for some reason but I can assure you they are! Also used some of the same rubber gasket from the screen to get provide a watertight seal to the body.
And as per usual, got carried away and attached the number plate (show plate of course - I also have standard colouring, but these suit the car so much more
). Anything I'm attaching will come off when it goes for spraying, but it's useful for working out proportions as I don't want to making mistakes once it's painted!
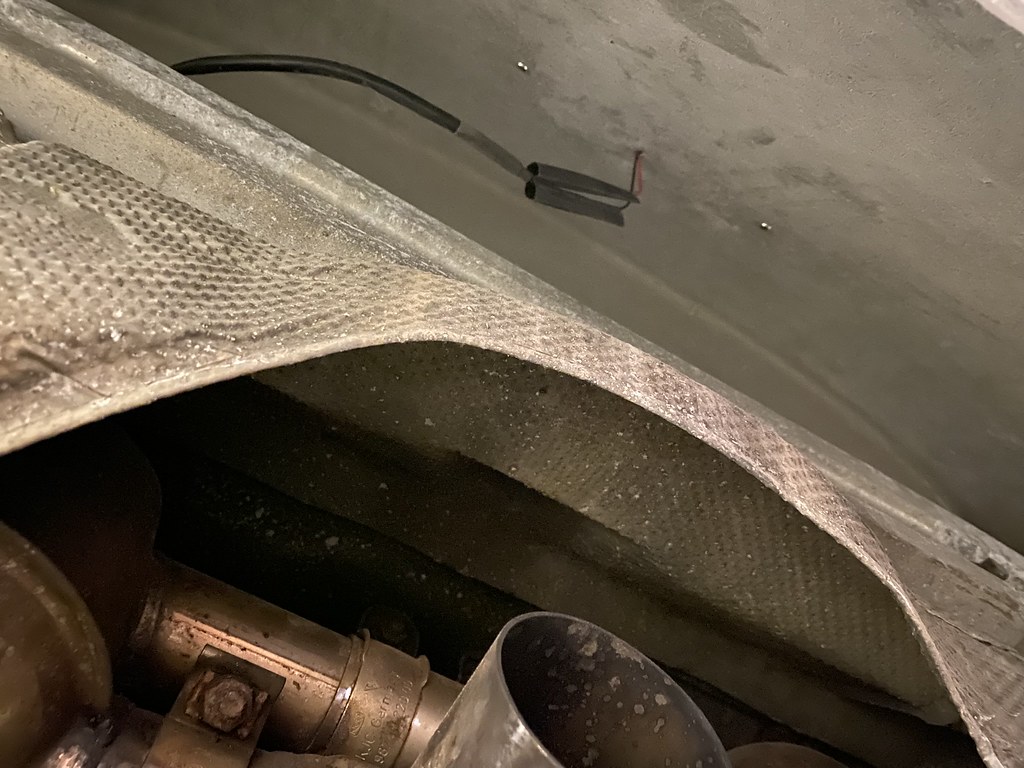
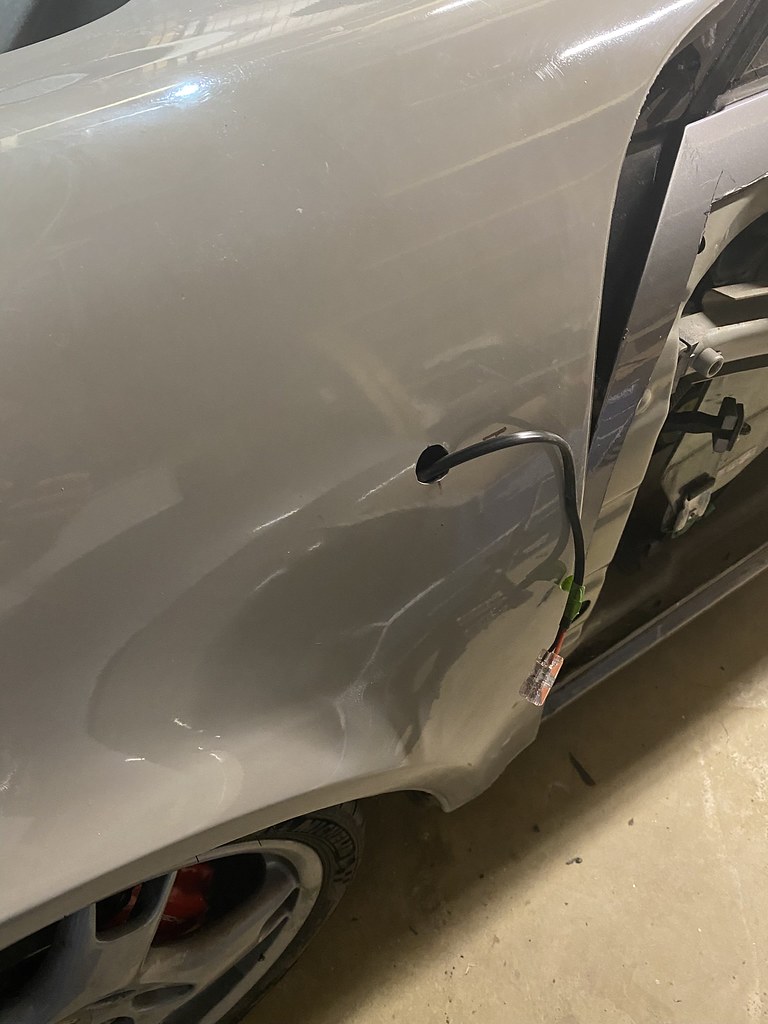
Access was a pain in the ass! Since I took the photo I've heatshrunk the cable and zip-tied it to the chassis out of view (and debris). I need extend the exhaust too so it clears the new body - not sure which design to go, maybe a single round pipe rather than the original twin?
It then leads me onto this - where do you think the reverse light should go? 1, 2, 3 or 4 The fog will go in the mirror image on the other side. At the moment I think 1 looks the best, or 4... 3 is on the curve so the light will be on the p1ss unless I work out a way of levelling it. 2 might make the back look a bit cluttered. Light is 90mm diameter circle with chrome edge to match the 356 original.

Started doing the same spacing out to the front - headlights temporarily in (they'll be a little higher when attached), bonnet handle on, grills and indicators on, number plate on (annoyingly drilled the holes in the wrong place - I assumed in the middle but they needed to be at the top to keep the plate straight 🤬 Will order a replacement soon). You can also see the wiper spindles a bit better here. Mounted the front valance as well, which was a bugger to do with limited access - looks much nicer now though! The slats still need some sanding to be fair
And finally...
There is the P O R S C H E badge to go on the front too, which will fill the space between the driving lamps and below the bonnet - I think without this it looks a bit empty.
This week I'm going to try and work out the door wiring (I think I've said that every update) then a bit more gapping of the bodywork, bond the front and rear completely down, get the doors skins on, trim the speedster humps, then I think, think, it's ready for painting 😎👍
Enjoy your week everyone 👍
-
5
-
-
Project 387
in 987
I've been at a trade show this weekend so I haven't been able to put much time in, but I've taken a few photos of the progress I have made.
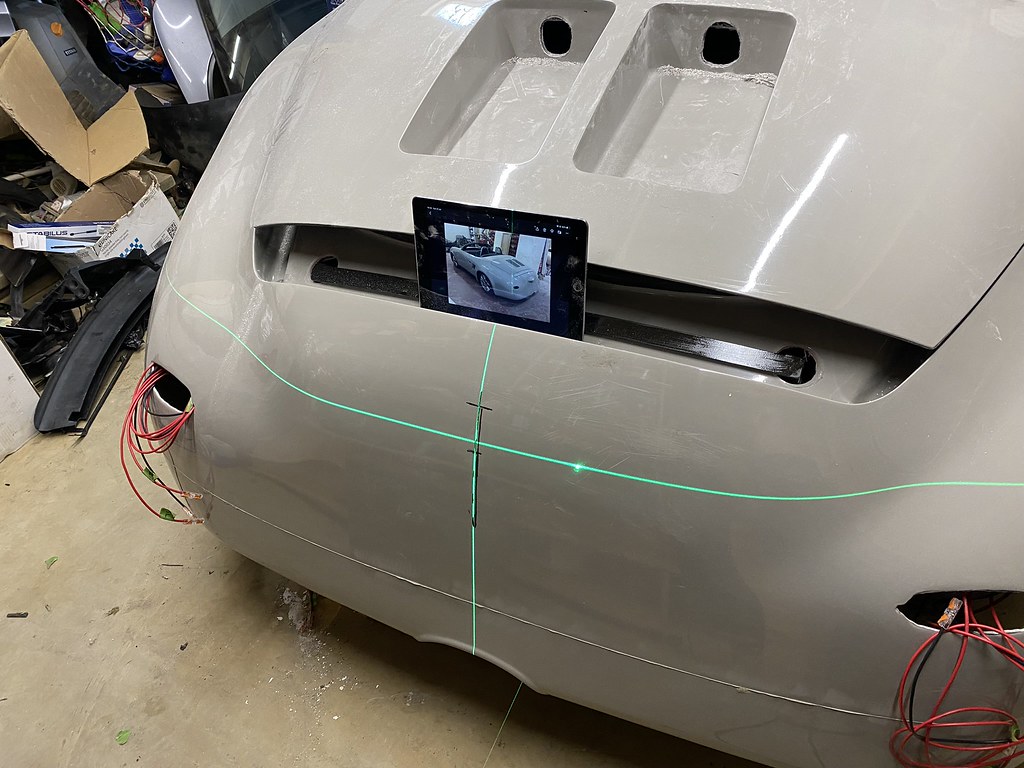
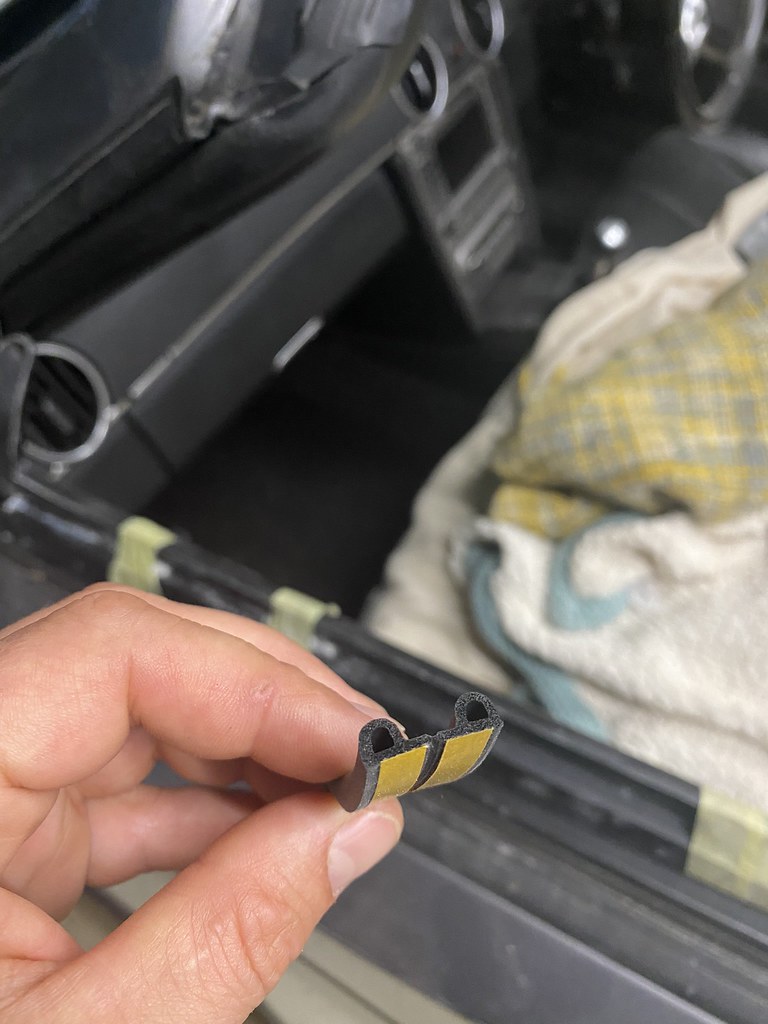
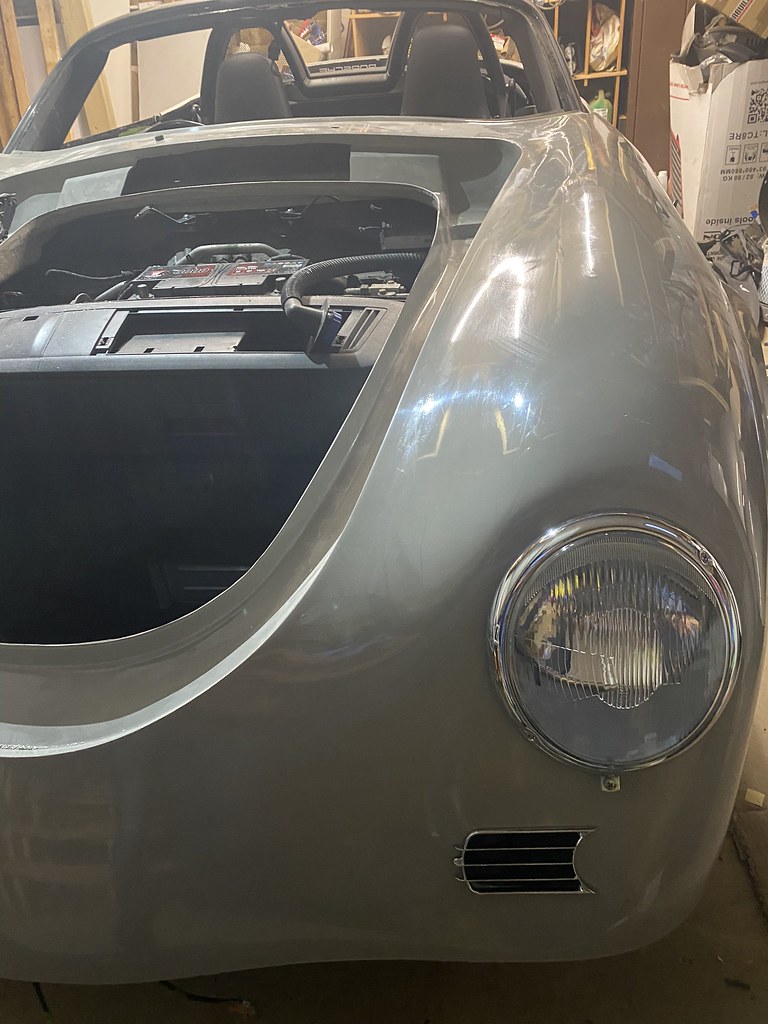
Spent a load of that time making the front clam fit - again it's on/off until it's nice and snug. Once it was sitting correctly I sealed the internal valance now with a rubber strip to form a gasket. You can see a slight gap to the dash but this nips up once there is the weight of the clam on top. My dog is clearly interested in what I was up to!
This is the rubber strip I used
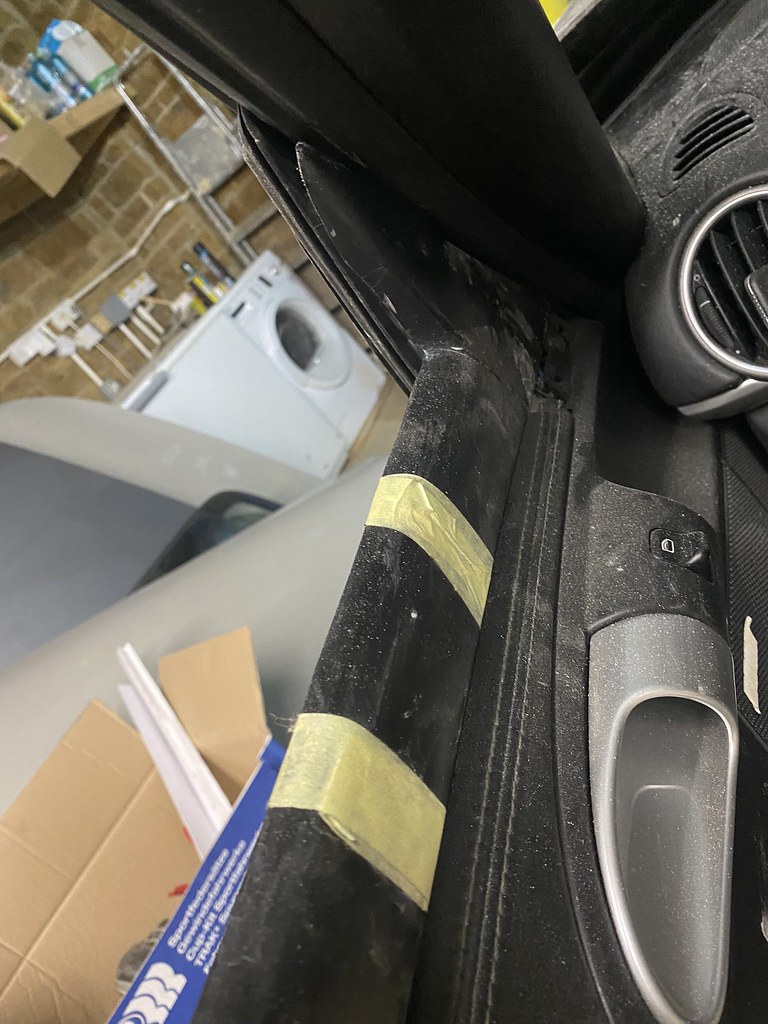
The below shows the new trim to raise the internal profile of the door
New tonneau and boot lid in place - these need attaching properly then gapped
I primed the car bodywork ready for the adhesive - all of the rougher parts of the body will be sanded when it goes off for paint - luckily they do the bulk of this!
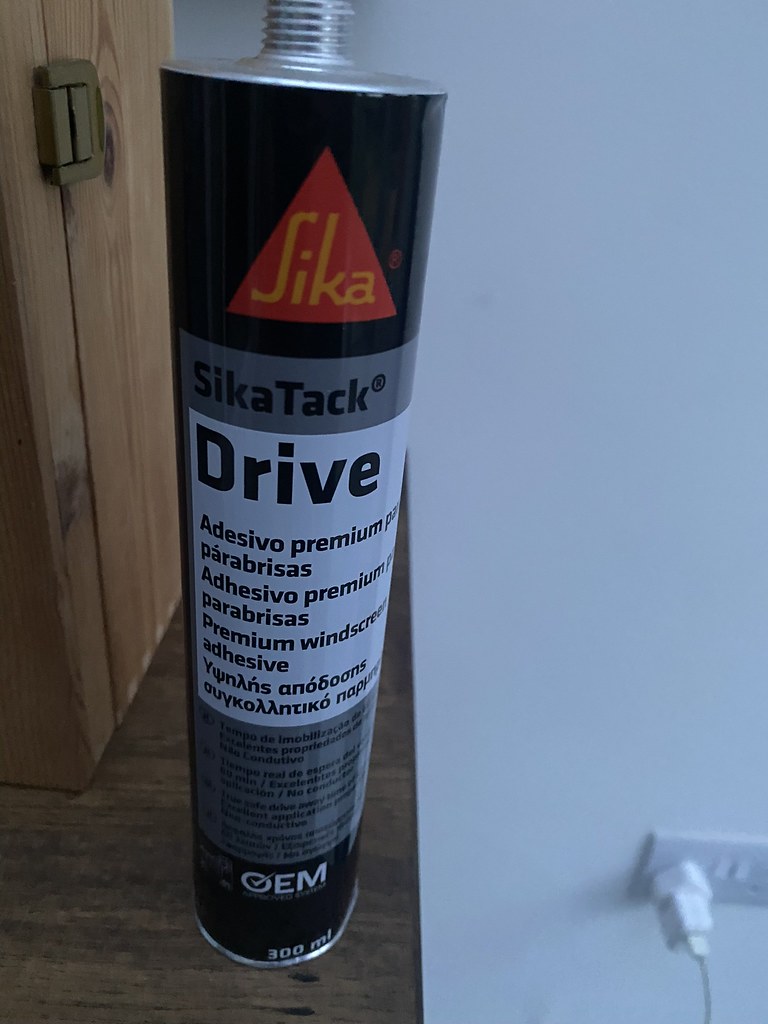
Super sticky adhesive! Warming up in the house so it flows easier
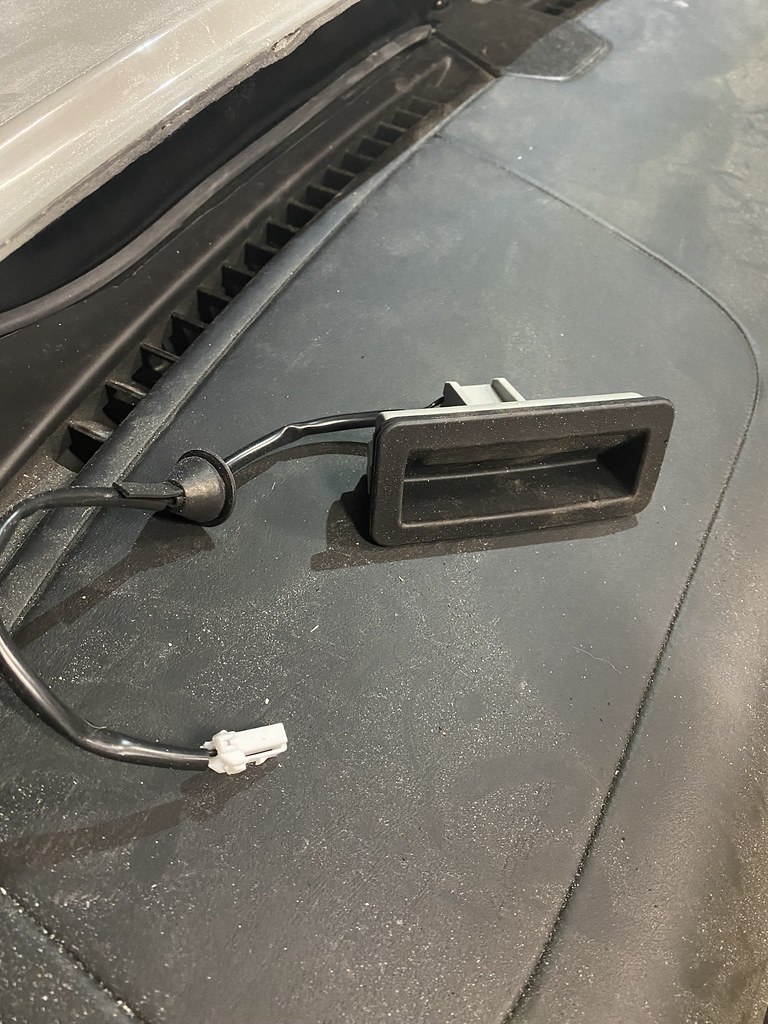
New door handle - it's a Ford Focus boot release! Needs cutting into the door (still need to work out the wiring - I think a feed from the window switch)
Bit of a better shot of the new location for the wiper mechanism - there are cover plates provided for the big holes!
(a dusty) Wiper mechanism put together and ready to go in
Worked out where the side repeaters should go and holes drilled
And then got excited as usual so put the light and front grill in
It's coming together (slowly!)
I'm away this week with work but hope to get a chunk of time this weekend on it - next up bonding the front on, gapping, filling, sanding, door electrics, bond doors on permanently... list keeps growing!
-
5
-
1
-


Project 387
in 987
Posted
Thank you - the 'right' price where they sell more easily seems to be between £40-50k, which is still a lot of money of course (particularly for the car it's based on). It's a tricky one to place in the market as it's lower much than the Outlaw or Starke, or even Singer (£200k+), but obviously still something fairly unique.
Being honest it's the final little finishing details I'm most nervous about getting right; for example the front bonnet latch has to be turned through 180deg so it fits around the new clam. This means the handle to unlatch it completely needs fabricating and a neat slot creating.
To me it's all those bits that if not done nicely, will make it look like what it ultimately is... If done well however I think it's got the opportunity to look quite special - time will tell!